


 Seeds and Germination
 Grow Setup
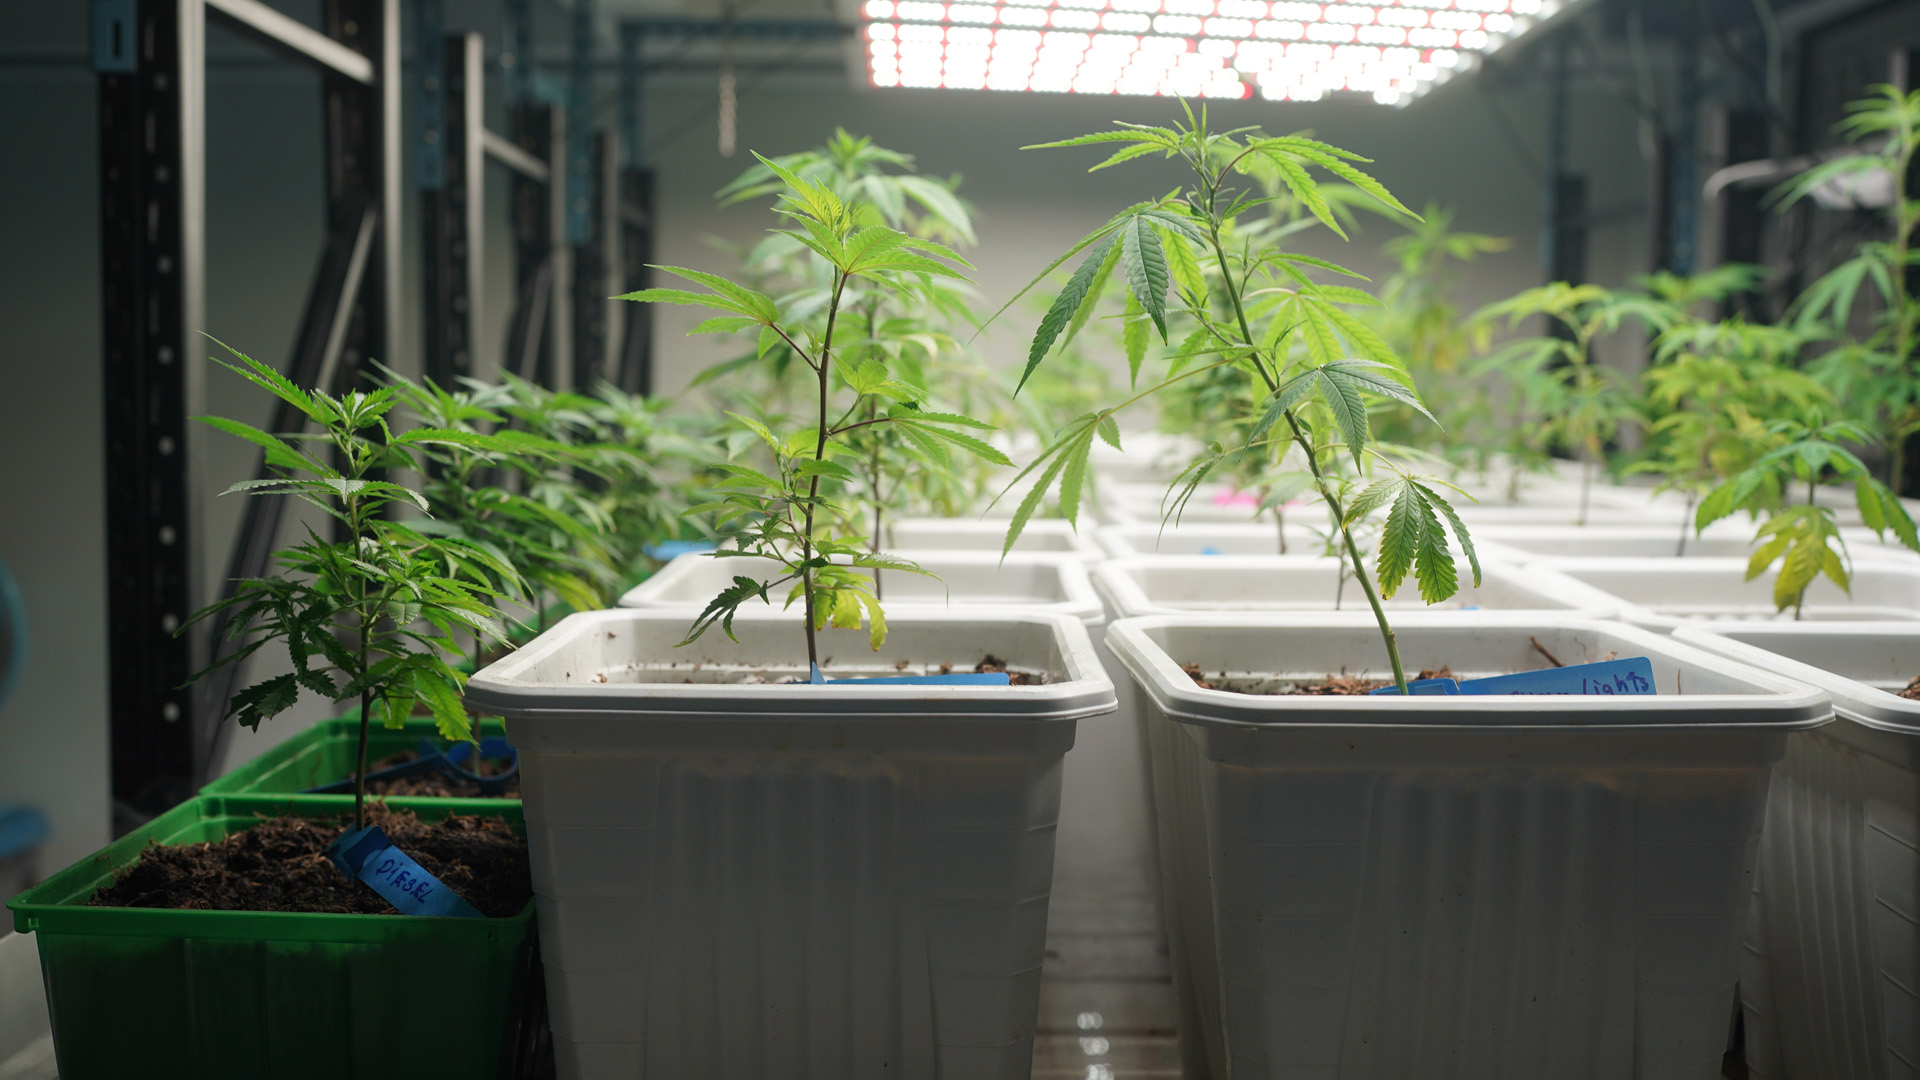
 Seedling Stage
 Vegetative Growth
 Pre-flowering
 Flowering
 Ripening
 Harvesting
 Drying
 Curing
 Troubleshooting
 Training Techniques
The Ultimate Guide to the Cannabis Flowering Stage
 15 Minute Read
PUBLISHED: May 10, 2024
Introduction to the Cannabis Flowering Stage
Overview of Cannabis Growth Stages
The cannabis plant life cycle can be broadly divided into four primary stages: germination, seedling, vegetative, and flowering. Each phase has its own requirements for light, nutrients, water, and care. However, the flowering stage represents the zenith of this cycle, where the plant directs its energy into producing the resinous buds that are harvested for their cannabinoid content.
Why the Flowering Stage is Pivotal
The flowering stage is crucial because it dictates the final yield and quality of the cannabis you’re growing. During this period, environmental conditions, nutrient management, and stress mitigation are immensely important. Any mistake can affect the plant’s ability to produce dense, potent buds, and could severely impact the overall harvest. This makes it absolutely essential to understand and navigate this stage with considerable attention and care.
Key Factors Influencing the Flowering Stage
- Light Cycles: Flowering in photoperiod strains is triggered by a shift to a 12/12 light cycle. Understanding how uninterrupted darkness influences flowering is key to preventing re-vegging or hermaphroditism.
- Nutrient Balance: Nutrient needs shift dramatically in the flowering stage, where phosphorus and potassium become more critical than nitrogen.
- Environmental Stability: Temperature, humidity, air exchange, and CO₂ levels significantly influence bud development, resin production, and the avoidance of molds or pests.
- Genetics: The strain’s genetic profile largely determines how long the flowering stage will last, the plant’s susceptibility to stress, and the potency, flavor, and aroma of the final product. So, the flowering stage for the Slurricane strain will be different to Purple Runtz.
The Pre-Flowering Transition from Veg to Flower
Understanding Photoperiod and Flowering Indicators
For photoperiod strains, flowering begins when the light cycle changes to 12 hours of light followed by 12 hours of uninterrupted darkness. This simulated shortening of days mimics autumn in nature, prompting the plant to begin producing flowers in an attempt to reproduce before the onset of winter.
It’s important to note that even brief interruptions in the dark cycle can stress a plant, potentially causing it to revert to vegetative growth or develop male flowers, known as “hermaphroditism.” Such stress events can dramatically reduce bud quality.
Autoflowering strains, on the other hand, will enter the flowering stage automatically after a few weeks of growth, regardless of light cycle changes. This makes them ideal for growers who cannot manage strict light schedules but can also lead to less control over plant development.
Differences Between Photoperiod and Autoflowering Strains
Photoperiod Strains:
- Light cycle-dependent: Requires a 12/12 light cycle to initiate flowering.
- Longer flowering period: Flowering can last anywhere from 7 to 12 weeks.
- Yield: Potential for larger yields due to longer vegetative growth opportunities.
- Growth control: Grower has more control over the plant’s size before flowering begins.
Autoflowering Strains:
- Automatic flowering: Begins flowering irrespective of the light cycle after about 3-4 weeks.
- Shorter life cycle: Typically ready to harvest in about 8-10 weeks from germination.
- Yield: Generally smaller yields due to the shorter life cycle.
- Growth control: Limited control over plant size and shape.
Environmental Preparation for Flowering
Transitioning to the flowering stage requires some key environmental changes:
- Lighting: Ensure you shift your grow room lighting to the correct spectrum for flowering, favoring red and orange wavelengths (580–700nm). This encourages bud growth while assisting with the ripening process.
- Temperature: Daytime temperatures should be maintained between 20-23°C (68-73°F), with nighttime temperatures slightly cooler, around 15-18°C (59-65°F). This gradual shift reflects natural light/sun cycles.
- Humidity: Lower the humidity to around 45% to prevent molds and promote resin production.
- Ventilation: Increase air circulation to manage humidity and ensure your carbon filter system is working efficiently to control odors.
- CO₂ Enrichment: Increasing CO₂ levels to 1,000-1,200 ppm can significantly boost growth and yield. Employ this within a closed-environment grow room for best results.
Nutritional Shifts and Preparations
The nutrient regimen shifts dramatically as the plant transitions from vegetative to flowering growth:
- Decrease Nitrogen (N): While nitrogen is crucial for vegetative growth, excess nitrogen during flowering can inhibit bud development and lead to overly leafy plants. Reduce nitrogen levels progressively as you approach the flowering period.
- Increase Phosphorus (P) & Potassium (K): Phosphorus is essential for flower formation, while potassium helps in the development of dense, resinous buds. Many flowering nutrient solutions emphasize a higher P-K ratio.
- Magnesium and Calcium: These secondary nutrients are critical for healthy flower development and preventing deficiencies like yellowing leaves.
- Micronutrients: Ensure the availability of essential micronutrients such as sulfur, copper, boron, and zinc, which all play roles in optimal flowering.
Weeks 1-3: The Stretch Phase
The “Flowering Stretch” – Surging Growth Explained
The initial weeks of flowering—often referred to as the “stretch” phase—can be bewildering for new growers. During this time, cannabis plants can double or even triple in height as they redirect energy into producing budding sites. This rapid growth is driven by the plant’s genetic impetus to gather as much light as possible before focusing on flower production.
Why does it happen?
The plant “senses” the shortening of days and acts to maximize its size and light-gathering ability for seed production, though in a controlled environment, the intention is bud production rather than seed formation.
Managing the Stretch:
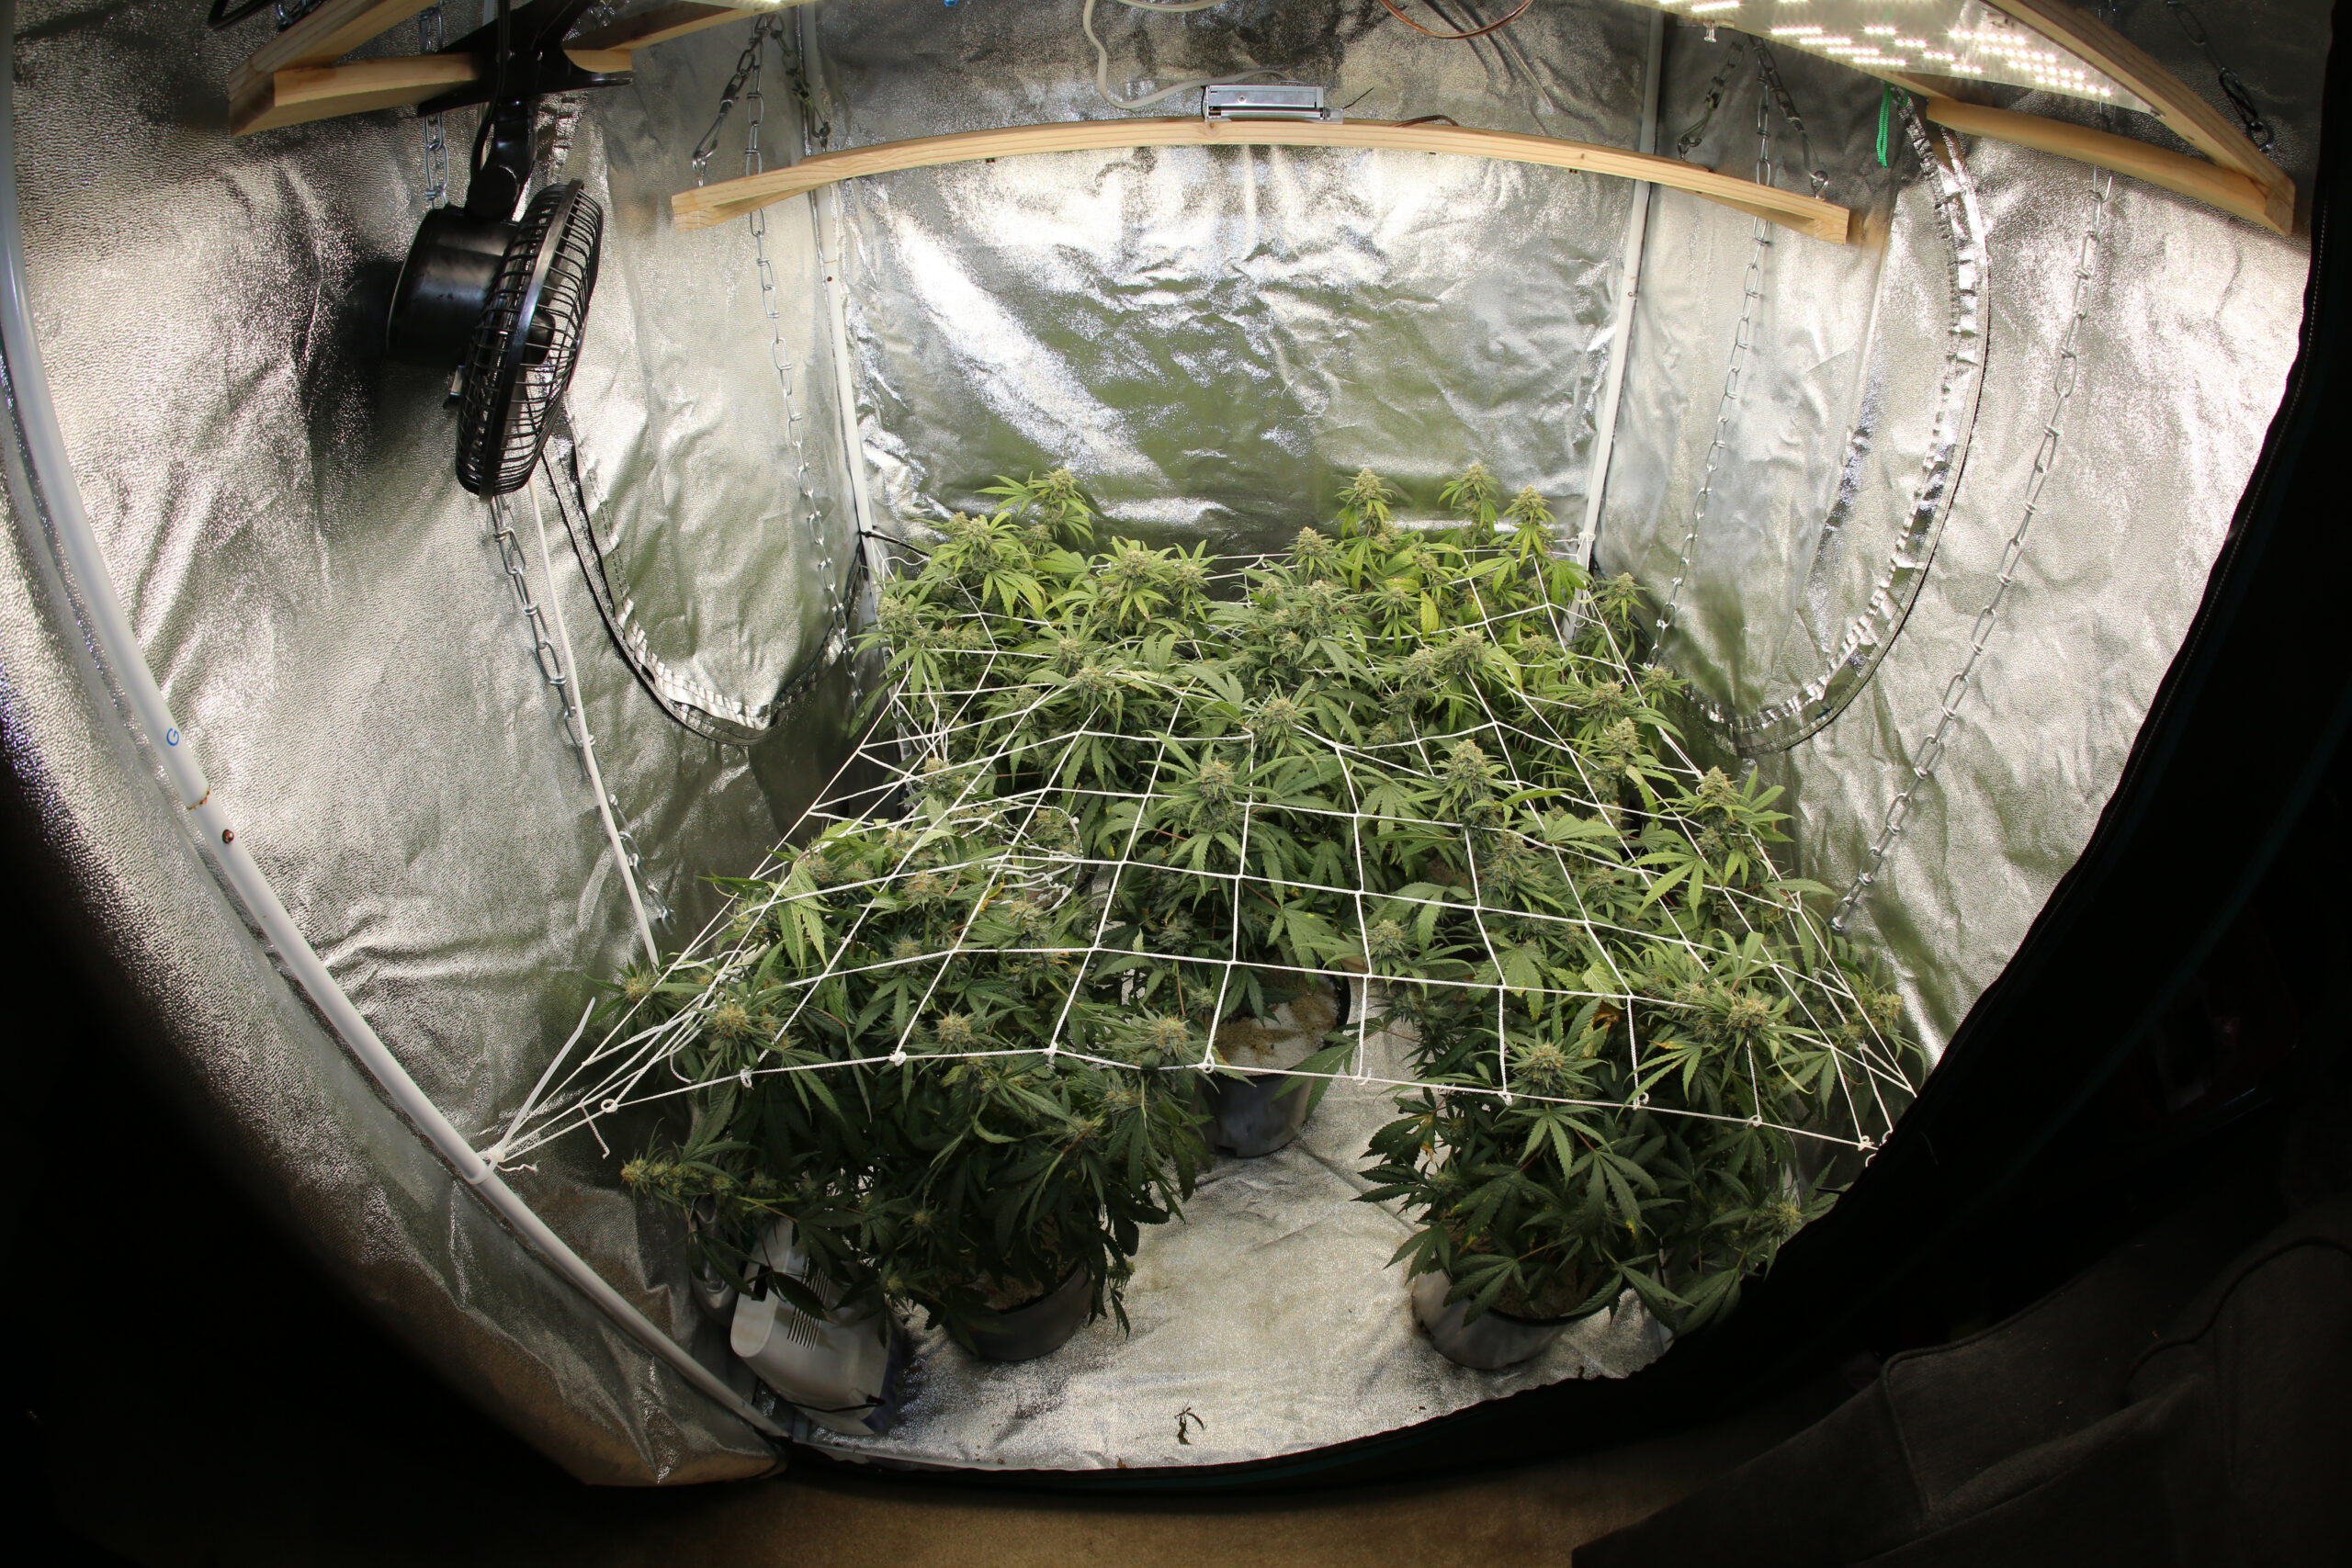
Controlling plant height is crucial during this time, particularly in indoor grows where space and light penetration are limited. Techniques like Low-Stress Training (LST) or the use of trellises can manage height and ensure that your canopy remains even. A uniform canopy allows each bud site to receive equal amounts of light.
Sexing: Differentiating Male and Female Plants
For regular, non-feminized seeds, it’s critical to determine the sex of your cannabis plants once the flowering cycle begins. Males must be identified and removed promptly to avoid pollinating female plants and creating seeds, which decrease the quality and yield of the harvest.
Identifying Males:
- Preflowers: Males typically reveal themselves earlier than females, showing small pollen sacs that resemble clusters of tiny green grapes.
- Timeframe: Male preflowers generally appear within the first two weeks of the flowering stage.
Female Characteristics:
- White pistils: Females develop thin, white hairs (pistils) at nodes where branches meet the main stem. These eventually form the calyxes that become part of the flower.
Training Techniques for Early Flower
Low-Stress Training
LST is a technique essential for optimizing the light exposure of indoor cannabis plants during the flowering stretch. By gently bending and securing stems, you can create an even, flat canopy, which ensures that all parts of the plant receive sufficient light.
Steps for Effective LST:
- Timing: The best time to start LST is as early as possible in the vegetative stage, but the flowering stretch is your last viable window.
- Tools: Use soft plant ties or horticultural tape to secure branches to stakes or the side of the pot.
- Bend, Don’t Break: Gently bend branches down and away from the center of the plant, being careful not to snap stems.
Benefits of LST:
- Uniform Bud Maturity: An even canopy ensures that all bud sites receive equal light, resulting in uniform flower development.
- Maximizing Space: LST helps manage space by keeping the plant’s overall height in check, which is particularly important in grow tents.
Pre-emptive Troubleshooting
The stretch phase is also a time when plants are most susceptible to environmental stressors. Addressing potential issues early can prevent complications later on:
- Overwatering: As plants grow, their root systems will require more oxygen. Avoid overwatering by ensuring proper drainage and only watering when the top inch of soil is dry.
- Nutrient Adjustments: Transitioning nutrients slowly from their vegetative formulation to a flowering blend can prevent shock or nutrient lockout.
- Pest Control: The rapid growth of this phase also makes the plant more susceptible to pests. Consider introducing preventive measures such as neem oil or beneficial insects early on.
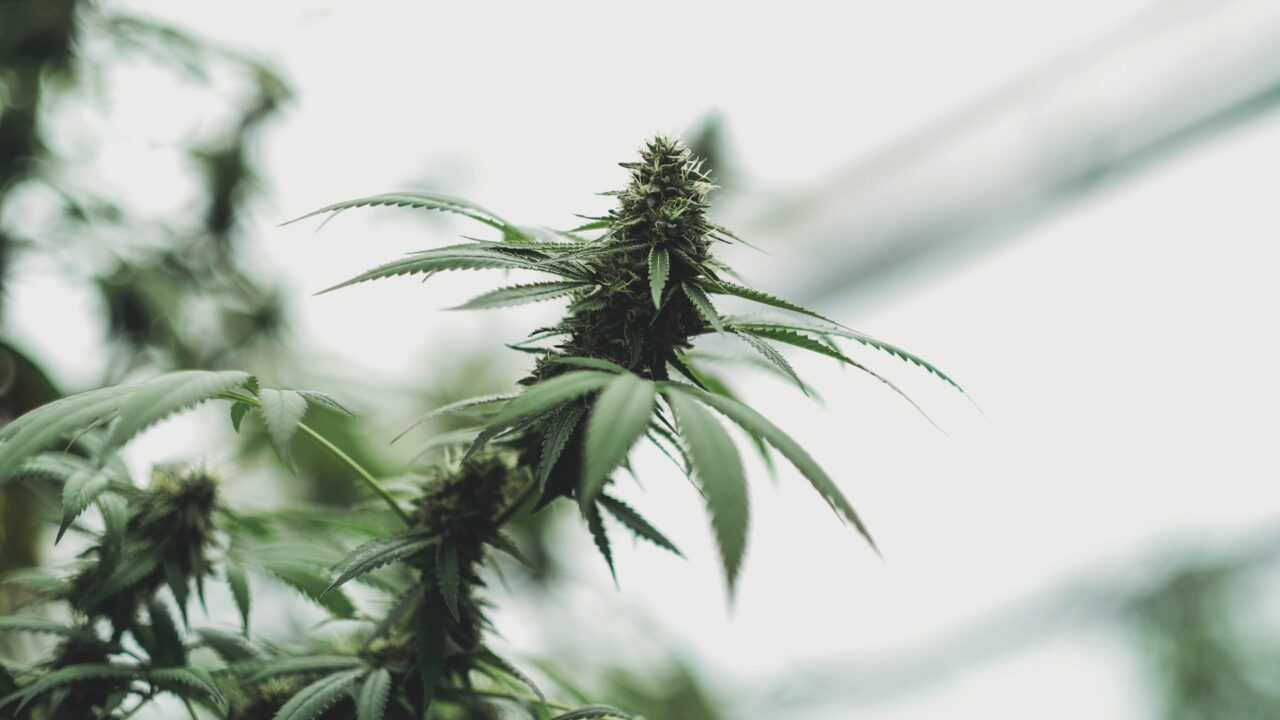
Weeks 3-4: The Budlet Formation Stage
Initial Flower Development – Budlets and Pistils
By weeks 3 and 4, the rampant vegetative growth begins to slow, giving way to the first tangible signs of flowering. The bud sites that initially developed white pistils now start to form small budlets—tiny indicators of the flowers to come.
What to Expect:
- Reduction in Height Growth: While the plant may still grow taller, the rate will reduce significantly, and its energy will increasingly be directed towards flowering.
- Formation of Calyxes: Budlets are composed of small clusters of calyxes, the primary component of cannabis buds. As they mature, they’ll be densely covered in pistils.
Humidity, Temperature, and Light
As the plant begins to develop flowers, maintaining optimal environmental conditions is crucial:
- Humidity: Lower humidity to around 45% during this stage to prevent mold formation within the developing budlets.
- Temperature: Continue to maintain daytime temperatures of 20-23°C and nighttime temps around 15-18°C. Avoid drastic fluctuations which can induce stress and promote hermaphroditism.
- Light Intensity: Ensure that your grow lights are positioned at an optimal distance from the canopy, typically around 12 to 18 inches for most LEDs. If using HPS, maintain a greater distance (around 24-30 inches) to avoid light burn.
Balancing N-P-K Ratios
As your plants enter the budlet formation stage, their nutrient requirements shift further:
- Nutrient Exchange: Decrease nitrogen levels even more, focusing on a nutrient solution high in phosphorus and potassium. A common nutrient ratio used during this stage is 1-3-3 (N-P-K).
- Micronutrient Assistance: Keep a closer eye on deficiencies in calcium, magnesium, and sulfur, which are critical in this stage to promote healthy bud formation.
- Sugar Additives: Some growers apply molasses diluted in water during weeks 3-4 to improve microbial activity in the root zone, leading to enhanced nutrient uptake.
Identifying and Preventing Common Issues like Nutrient Burn, Deficiencies, and More
At this stage, the plant’s nutritional and environmental needs are fine-tuned. Several key issues often crop up:
- Nutrient Burn: One of the most common problems during flowering is nutrient burn, caused by an overabundance of nutrients. This manifests as browning or burning at the tips of leaves. Reduce feed concentrations gradually if symptoms appear.
- Deficiencies: Yellowing leaves can indicate nitrogen deficiency (not a major issue during this phase), but more critically, deficiencies in potassium and phosphorus can stunt flowery growth. Always test your growing medium’s pH balance to ensure optimal nutrient uptake.
- Pests and Mold: Plants are still vulnerable to pests; continue monitoring closely and use organic pest controls like neem oil or insecticidal soaps. Keeping the humidity in check is crucial to avoid mold, a frequent problem starting at this stage.
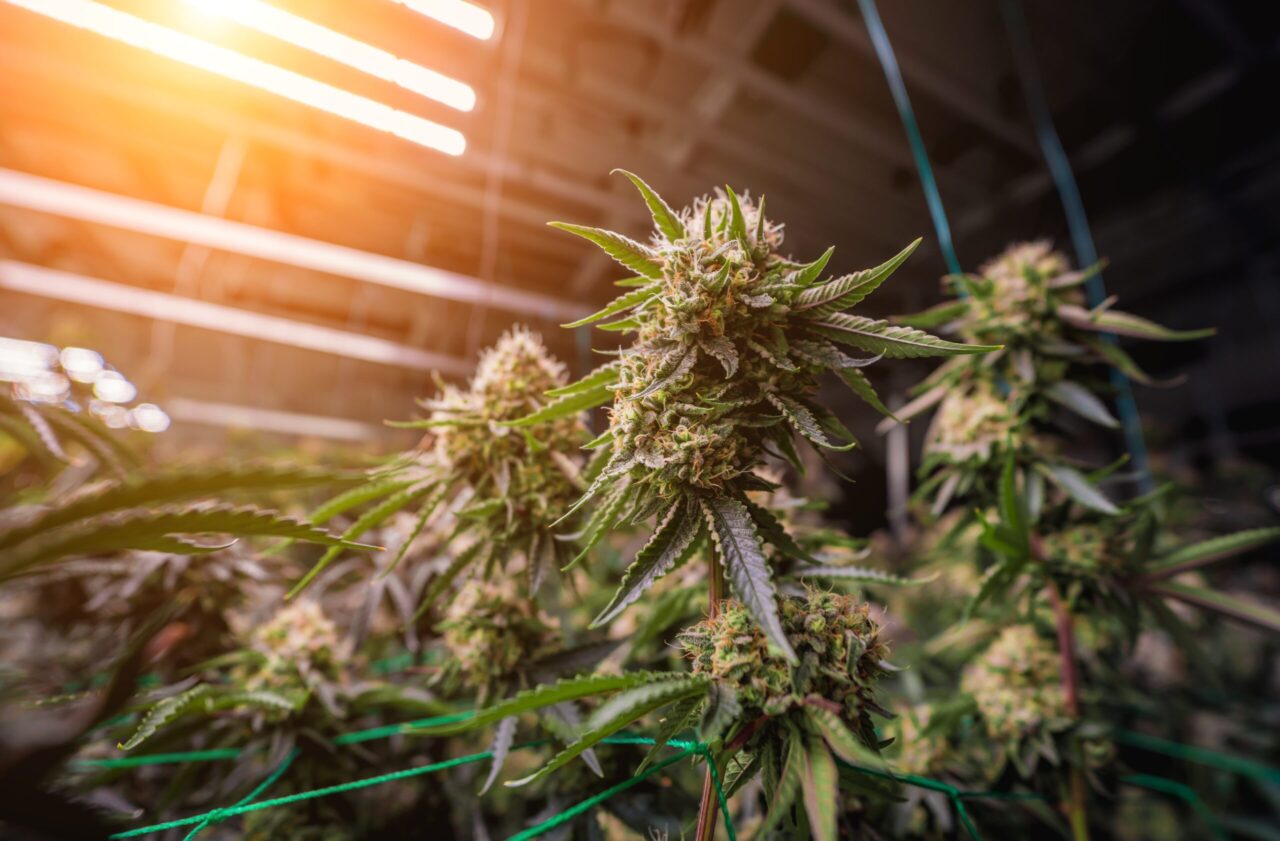
Weeks 5-6: Full Bud Development
Flower Thickening and Resin Production
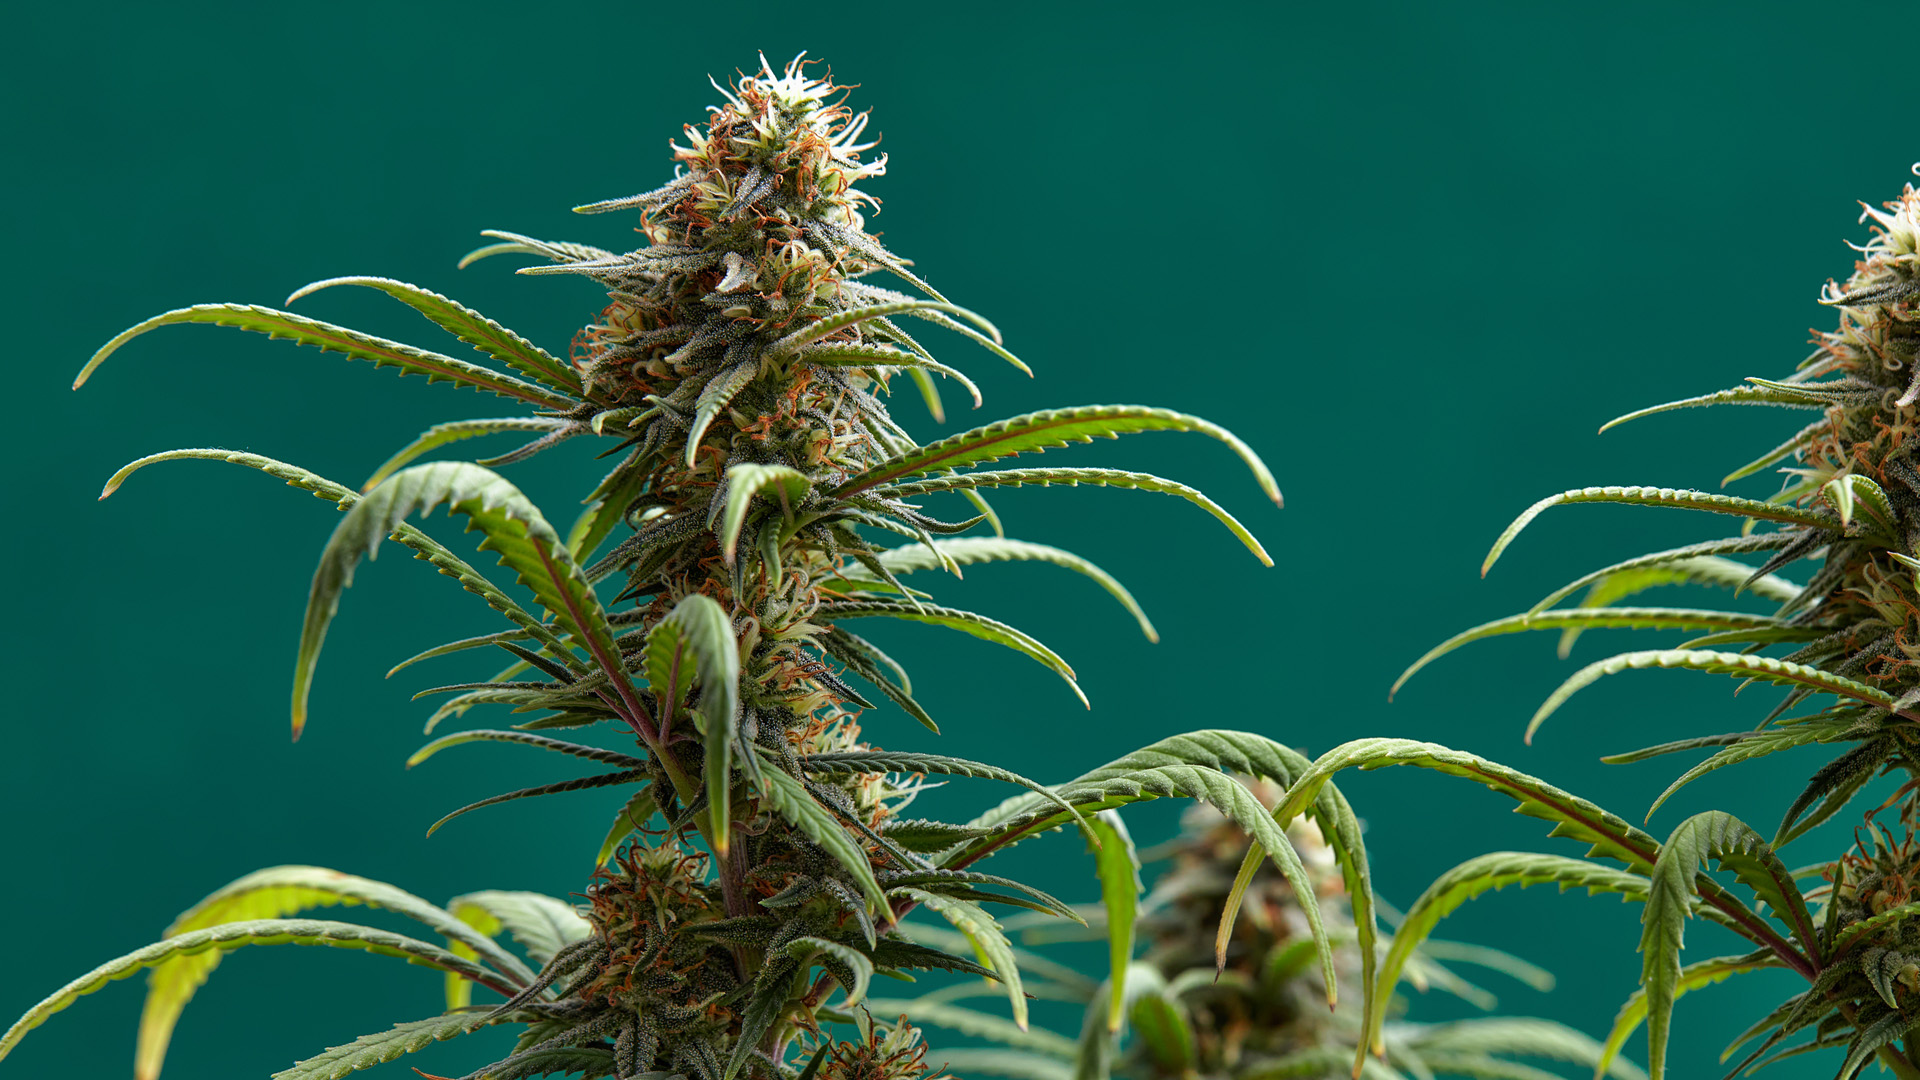
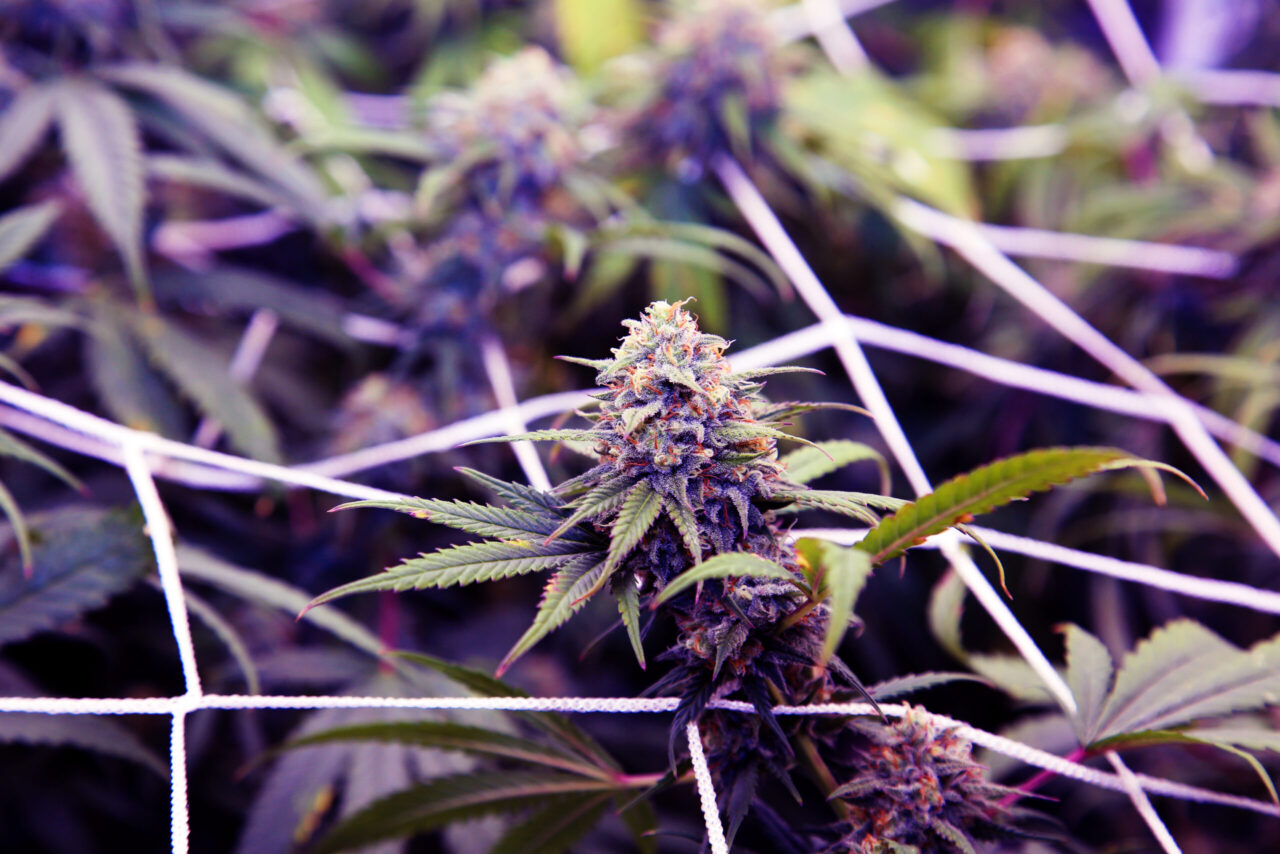
By weeks 5 and 6, the plant should be in full bloom, with flowering taking center stage. Buds are thickening, calyxes are stacking upon one another, and a fine layer of resin or trichomes begins to cover the flowers.
Developing Trichomes
- Purpose: Trichomes are glandular appendages on the surface of buds and smaller leaves, producing the resin that contains cannabinoids like THC and CBD.
- Visual Changes: The development of a frost-like appearance on the buds signals the onset of significant resin production.
Improving Aroma
It’s around this period that plants often emit their strongest odors. Some strains have a potent smell that will require you to manage it using carbon filters, air purifiers, or other odor-control systems.
Lighting and CO₂ Supplementation to Enhance Trichome Production
Trichomes are not merely aesthetic; they are essential for the medicinal and psychoactive properties of cannabis. Enhancing trichome production can be achieved through:
- Light Spectrum: Utilize full-spectrum LED or HPS lights that focus on the red (630-660nm) and far-red (700nm) wavelengths. UVB lights can also be strategically employed for short periods to boost trichome production.
- CO₂ Levels: Elevating CO₂ during flowering can increase bud size and potency. Keep CO₂ levels between 1,000-1,200 ppm for maximum flower production, but ensure your grow space is sealed and well-ventilated to balance CO₂ with oxygen levels.
Advanced Nutrient Strategies – Boosters and Supplements
Introducing specific boosters and supplements during mid-flowering can supercharge your plants’ performance:
- Phosphorus & Potassium Boosters: Specialized bloom boosters enhance bud density, increasing the yield and resin production.
- Amino Acids & Vitamins: Some organic supplements containing amino acids, Vitamin B1, and carbohydrates can help the plant deal with stress while fueling bud production.
- Bloom Enhancers: Commercial products aimed at optimizing oil production and overall bud heft can be introduced during these weeks. Be cautious to avoid overfeeding, which could lead to nutrient lockout or burn.
Odor Management and Ventilation Solutions
Given the intensifying smell during this phase, odor control becomes more critical:
- Carbon Filters: Ensure your carbon filters are working efficiently. Regularly check for clogs and replace them if the smell is leaking through.
- Ozone Generators: These can neutralize odors in unventilated areas but use them carefully, as high ozone levels can be harmful to plants and humans alike.
- Odor-Absorbing Gel: This can be placed strategically around the grow area to absorb smells rapidly, but it should be used alongside core ventilation systems.
Weeks 7-8+: The Ripening Phase
Signs of Maturity – Pistil and Trichome Changes
As the plant moves into its later weeks, the buds begin to ripen, showing clear signs of maturity:
- Pistil Changes: The once white pistils will start to darken, turning brown or amber. Most pistils will have changed color by the time the bud is fully mature.
- Trichome Clarity: Using a jeweler’s loupe, examine the trichomes. Initially clear, they will turn a milky white as cannabinoids reach their peak. As they further mature, some trichomes will turn amber, signaling the onset of THC degradation. The peak moment for harvest is usually when most trichomes are milky with a few turning amber.
Flushing to Remove Residual Nutrients
Flushing is a critical step to ensure your final product is smooth, flavorful, and free of harsh chemicals:
- When to Flush: Generally, flushing should begin 10-14 days before your anticipated harvest date.
- Methods: Stop feeding any nutrients and instead water your plants with plain, pH-balanced water. In hydroponic systems, some growers use a flushing solution to expedite the removal of nutrient buildup.
- Purpose: Flushing removes excess salts and nutrients from the soil or hydroponic medium, which prevents them from accumulating in the buds. This results in a cleaner, smoother smoke.
- Watch for Yellowing: As your plant gets flushed, the leaves will start to yellow, indicating that the plant is using up its nutrient reserves. This is a normal part of the process and nothing to worry about.
Planning for the Harvest in the Final Weeks
The final week before harvest is critical for making sure your plants are ready:
- Lighting: Some growers reduce the light cycle to 10/14 or even 8/16 during the last 7-10 days to simulate autumn conditions. This can encourage the final stages of ripening.
- Environmental Tweaks: Some growers choose to lower the temperature slightly in the last week, which can help bring out purples and blues in the buds (if genetically predisposed) and increase resin production.
- Watering: As you get closer to harvest, you may reduce the watering frequency to allow the growing medium to dry out slightly, which can make harvesting and drying easier.
- Harvest Tools: Preparing sharp scissors or trimmers, gloves, and drying racks or hangers in advance will make the harvest process smoother and more efficient.
Managing Stressors and Avoiding Late-Flowering Issues
Avoid making drastic changes in the final weeks, as stress can affect bud quality:
- Lighting Issues: Now is not the time to experiment with your lighting setup. Sudden exposure to high-intensity light or outages can stress the plant and diminish your final yield.
- Environmental Stress: Keep environmental variables as stable as possible. Avoid sudden changes in humidity or temperature as these can invite mold or issues like bud rot, especially in dense buds.
- Bud Rot and Mold: Closely inspect buds for any dark, mushy spots or white, cotton-like growth which may indicate mold or bud rot. Remove affected areas immediately to prevent the spread.
Specialized Techniques for Optimizing Flowering
Supercropping
Supercropping is a high-stress training technique used to boost yield by focusing plant energy on more productive bud sites:
- Timing: This technique is typically done during the early stages of flowering but can also be a last resort if plants have outgrown your space during mid-bloom.
- Method: Using your fingers, gently crush the inner tissue of a targeted stem at a 90-degree angle to bend it without breaking. This increases hormone production, which helps buds grow larger and more potent.
Lollipopping
Lollipopping involves removing the lower branches and foliage unexposed to light, enabling the plant to focus its resources on the upper bud sites:
- When to Lollipop: This should ideally be done early in the flowering stage, particularly during weeks 1-2. Doing it later can stress the plant and reduce yields.
- Effectiveness: Lollipopping clears out small, unproductive “popcorn” buds that hardly get any light, redirecting plant energy to the main colas.
Defoliation Strategies for Maximizing Yields
Defoliation is another advanced technique that can dramatically increase light penetration and air circulation through the canopy:
- When to Defoliate: Strategic defoliation should be done in the early flowering stage (weeks 2-4) and can be repeated in the mid-flowering stage depending on the strain.
- How to Defoliate: Remove large fan leaves, primarily those that are shaded and not contributing sufficiently to photosynthesis. Be careful not to strip the plant of too many leaves, as this can weaken it.
Supporting Heavy Buds Using Stakes, Nets, and Ties
As buds grow larger and heavier, they may require additional support to prevent branches from snapping:
- Trellising: Scrog nets (Screen of Green) can evenly distribute the weight and keep the plant stable within confined spaces.
- Bamboo Stakes: In larger grows, individual branches can be supported with bamboo stakes, carefully tying each branch with soft string or horticultural clips.
- Yoyo Hangers: These tools allow for adjustable support from above, keeping top-heavy colas upright and well-ventilated.
Troubleshooting and Problem-Solving During Flowering
Identifying Nutrient Deficiencies: Symptoms and Solutions
During flowering, nutrient deficiencies can manifest in various ways:
- Calcium Deficiency: Recognized by brown spots or edges on leaves. Correct it by using Cal-Mag supplements.
- Phosphorus Deficiency: Look for purple stems, dark blotches on leaves, and slow bud development. Increase phosphorus input to correct the issue.
- Potassium Deficiency: Older leaves may develop brown edges and curl inwards. This is most common after mid-flowering. Potassium supplements or bloom boosters often address this.
Preventing Mold and Bud Rot: Environmental Controls
Mold and bud rot are serious threats during later stages of flowering:
- Humidity Control: Keep relative humidity under 45% in late flowering stages to reduce the risk of mold development in dense colas.
- Ventilation Enhancement: Increase airflow around dense buds with oscillating fans, and ensure constant air exchange to avoid stale air where mold can thrive.
- Inspect Regularly: Check colas frequently for dark spots, an indication that mold may be developing internally. Early detection is key to minimizing crop loss.
Dealing with Pests in Flowering: Organic and Safe Remedies
When pests invade the flowering stage, you need to act swiftly yet gently:
- Safe Insecticides: Use organic pesticides like neem oil, insecticidal soap, or a homemade mix of water and dish soap to combat pests. These can often be applied up to the last several weeks of flowering.
- Beneficial Insects: Consider introducing beneficial insects like ladybugs or predatory mites to your flowering room to fight off aphids, spider mites, and other pests.
- Manual Removal: Small infestations can often be controlled by manually removing larger pests with tweezers or a blast of water from a hose.
Fixing Light, Water, and Soil Imbalances
Each of these factors plays a critical role in successful flowering:
- Light Burn: If you notice the top leaves of your plant turning yellow or white (especially under HPS or LED lights), this is likely light burn. Raise your lights or reduce wattage to control the issue.
- Watering Practices: Avoid both overwatering and underwatering by adopting a “wet/dry” cycle, allowing the soil to almost fully dry between watering sessions.
- Soil pH: Ensure the pH of your soil stays in the sweet spot of 6.0-7.0. Use pH Up/Down solutions to correct any imbalances, and test regularly to maintain this range.
Final Preparations for Harvest
Harvest Timing – Understanding the Perfect Harvest Window
Timing your harvest is a balance between maximizing potency and yield, while also ensuring the desired effects from the cannabis:
- Trichome Inspection: Begin with a jeweler’s loupe or a small microscope to observe the trichomes. As noted before, milky white trichomes indicate peak potency, while amber ones lean toward a more relaxing effect.
- Pistil Color: Although not as precise as trichome observation, pistils can also be an indicator. When 70-90% of them have turned brown or amber, plants are generally ready for harvest.
- 1-2 week window: The harvest window is usually around 1-2 weeks; don’t miss it, as THC levels start to decrease as trichomes over-ripen.
Drying and Curing Overview – Techniques for Preserving Terpenes and Potency
Drying and curing are absolutely critical for maintaining the quality and flavor of your harvest:
- Drying Room Setup: The optimal environment for drying is a dark room with a temperature between 18-21°C (65-70°F) and humidity levels around 45-55%. Larger spaces may require dehumidifiers and fans to maintain these conditions.
- Hanging or Racking: Hang whole plants upside down or place trimmed buds on drying racks. The drying period typically takes 7-10 days.
- Curing in Jars: Once dried, buds should be “cured” in airtight glass jars. Open them daily for 10 to 15 minutes during the first week (this is known as “burping”), then reduce openings to every few days after that. Curing should be done in a dark, cool place and usually lasts for 2-4 weeks.
Post-Harvest Processing – Trimming, Manicuring, and Storage
Properly processing your buds post-harvest will maximize their longevity and quality:
- Trimming: Hand-trimming is labor-intensive but often results in the highest quality buds. Machine-trimming is faster but tends to remove more trichomes and can harm bud appeal.
- Manicuring: After trimming, further care can be taken to remove any remaining sugar leaves to tidy up the buds, improving their final appearance.
- Storage: Preserve the potency and flavor of your harvest by storing it in a cool, dark place in airtight containers. Adding humidity packets to jars can help maintain optimal moisture levels, preventing both mold and overly-dried buds.
Evaluating Success – Reflecting on Yield, Quality, and Lessons Learned
Post-harvest reflection is essential for improving your growing techniques and planning future cultivation efforts:
- Yield vs. Expectations: Weigh your dried and cured buds and compare the yield to your expectations. Deconstruct what went well and where you could improve.
- Quality Assessment: Critically assess bud quality in terms of appearance, smell, effect, and even the smoothness of the burn.
- Record-Keeping: Document important growing details including strain performance, flowering time, nutrient schedules, and environmental conditions, so you can replicate success or adjust for future grows.
Advanced Considerations
Breeding During Flowering: Risks and Rewards
Breeding new strains requires a balance between timing and environmental control:
- Pollen Control: Isolate male plants used for breeding to prevent unwanted pollination. Consider using a dedicated breeding room.
- Selective Breeding: Identify target traits in both parent plants. Allow pollen sacs to fully mature before collecting, and apply to females in the early to mid-flowering stage.
Flushing with Phosphorous-Free Water
Flushing with non-phosphorous-flavored water in the final two weeks is a heated debate:
- Pro-Flush: Many growers believe flushing improves the taste and smokability of buds by eliminating residual fertilizers.
- Anti-Flush: Some studies suggest that flushing has no scientific grounding and may even cause undue stress, potentially diminishing trichome production.
Experiment with flushing and non-flushing methods to see what works best for your specific grow operation.
Controlled Stress Techniques
Applied stress in small, controlled amounts can result in higher potency buds:
- Ice Baths: Placing ice on the soil in the final days before harvest can mimic winter frost conditions, potentially increasing resin production.
- Dark Period: Some growers recommend keeping the plants in complete darkness for 24-48 hours before harvest to trigger an enhanced final resin push.
Sustainable Practices to Use During the Flowering Stage
As demand for cannabis continues to grow and more cultivators become environmentally aware, sustainable growing practices are becoming increasingly important. Let’s explore some advanced techniques tailored to the flowering stage that not only optimize plant health but also minimize environmental impact.
Organic Nutrient Solutions
Switching from synthetic to organic nutrient solutions can significantly improve soil health and reduce the likelihood of chemical build-up, which can adversely affect the flavor and quality of the final product. Organic fertilizers are often derived from plant, animal, or mineral sources and aim to enrich the soil with essential nutrients naturally.
- Compost Teas: These can be used as natural flowering boosters. Brewing your compost tea involves steeping compost in water, sometimes with added inputs like molasses, and then applying it to your plants.
- Bio-fertilizers: These can introduce beneficial microbes into the growing medium, improving nutrient uptake and enhancing soil structure.
- Cover Cropping: You can grow cover crops like clover, which fix nitrogen naturally and benefit the primary cannabis plants by improving soil health.
Energy-Efficient Lighting
Considering that lighting for indoor cannabis cultivation consumes a significant amount of energy, switching to more energy-efficient options during the flowering stage is essential.
- LED Lighting: LEDs are the go-to for energy savings, providing excellent light penetration with specific wavelengths optimized for flower production. Despite the higher upfront cost, their longevity and energy savings make them a sustainable choice.
- Light Timers: Using programmable light timers ensures your plants receive the exact light cycle needed (i.e., 12/12 for flowering) without wasting electricity. Newer automated setups can adjust the spectrum as required.
- Solar Panels: If you have the capability, supplementing your grow facility with solar energy can drastically reduce your environmental footprint and save on utility costs long-term.
Water Conservation and Reuse
Water management is crucial, especially as flowering plants demand more water compared to the vegetative stage.
- Rainwater Harvesting: Collecting rainwater is a sustainable way to irrigate your plants. Ensure properly filtered storage to prevent contamination.
- Runoff Capture Systems: Implement systems to capture nutrient-rich runoff, which can be filtered and reused, decreasing water waste and reducing the need for additional fertilization.
- Drip Irrigation Systems: These deliver water directly to the plant roots, reducing wastage and ensuring more consistent hydration compared to traditional watering methods.
Closed-loop Hydroponic Systems
While hydroponic systems are already efficient, taking them a step further in terms of sustainability involves closed-loop systems.
- Nutrient Recycling: In a closed-loop system, the water containing nutrients is continuously circulated and reused. This not only conserves water but also maximizes nutrient use, reducing waste.
- Aeroponics: This method involves misting roots with a nutrient solution, using significantly less water than traditional hydroponic systems while promoting faster flowering due to high oxygen intake in the root zone.
Eco-friendly Pest and Mold Management
To keep pests and mold at bay, opting for natural and sustainable methods during the flowering period ensures that your plants remain healthy without harming the environment.
- Companion Planting: Certain plants like marigolds can naturally deter pests when planted near cannabis.
- Essential Oils: Organic essential oils like neem oil or tea tree oil can be effective against molds and some pests. When used in proper dilution, these pose no harm to the cannabis plant, soil, or surrounding ecosystem.
- Natural Predators: Introducing beneficial insects, like ladybugs for aphids or predatory mites for spider mites, into your grow room can naturally control pest populations without the need for chemical intervention.
Advanced Flowering Methods and Technologies
This guide has covered the full scope of traditional flowering practices, along with advanced techniques. However, as legalization spreads worldwide, innovations in cultivation techniques are proliferating at a rapid pace. Always remain open to refining and enhancing your skills by adopting new methodologies, planning for sustainability, or diving into research on the newest tools and trends in the cannabis industry.
Light Spectrum Manipulation
Advanced growers use specialized LED lights that allow for precise control over the light spectrum. By manipulating the ratio of red to far-red light, cultivators can influence plant morphology and potentially increase yield and potency.
Environmental Control Systems
Maintaining optimal environmental conditions is critical for successful flowering. Advanced systems allow for precise control over temperature, humidity, and CO2 levels, ensuring ideal growing conditions throughout the flowering stage.
Hydroponic and Aeroponic Systems
These soilless growing methods offer greater control over nutrient delivery and can lead to faster growth and higher yields. Recirculating deep water culture (RDWC) systems and high-pressure aeroponics are among the popular choices for advanced growers.
Plant Training Techniques
Advanced training methods like Screen of Green (SCROG), main-lining, and high-stress training (HST) can help increase yield and optimize light penetration. These techniques require skill and experience but can lead to impressive results.
Nutrient Delivery Systems
Precise control over nutrient delivery can optimize plant growth and bud development. Automated fertigation systems and IoT-enabled nutrient monitors allow for accurate and timely feeding of plants.
Harvesting and Processing Technologies
Advanced harvesting and processing methods can improve efficiency and preserve trichomes. Automated trimming machines and cryogenic preservation methods are becoming more common in large-scale operations.
The Future of Sustainable Cannabis Cultivation
The intersection between cannabis cultivation and sustainability continues to evolve. Keeping ahead of the curve means implementing practices that not only enhance the plant’s yield and potency during the flowering stage but also protect the environment for future cultivators.
With increasing regulatory focus on energy and water consumption in cannabis cultivation, particularly in regions grappling with climate change and drought cycles, sustainability isn’t just optional; it’s becoming a necessity. Those who adopt these practices early on will find themselves not only compliant with future regulation but also leaders in a burgeoning green industry.
The Flowering Stage Finale
The flowering stage in cannabis cultivation is both exciting and crucial. It is the period when the hard work from earlier stages begins to bear fruit—literally. However, the flowering phase is fraught with the potential for pitfalls that can severely impact the final yield and product quality. It’s crucial to be vigilant, attentive, and proactive.
By understanding the week-by-week needs of your cannabis plants, implementing advanced techniques, and embracing sustainability practices, you can ensure a bountiful harvest of top-quality cannabis flowers. Remember, each grow is an opportunity to refine your methods, experiment with new techniques, and contribute to a more sustainable future for cannabis cultivation.
Bonus Tip: Reflect and Document
Growing cannabis, like any agricultural practice, involves continuous learning. Keep a comprehensive journal of each grow cycle, noting what worked, what didn’t, and ideas for future improvements. Over time, this documentation will become an invaluable resource, helping you improve with each successive grow.
Stay curious, consistent, and committed to excellence, and you’re sure to see your crops—and your skills—bloom.
Final Thoughts (For Real this Time)
Flowering cannabis successfully is both a science and an art. It requires not only a comprehensive understanding of how the plant responds to its environment but also a passion for nurturing life. Whether you’re a first-time grower or a seasoned cultivator, this guide provides a comprehensive resource to navigate the intricacies of the flowering stage. From setup to harvest, and everything in between, you’re now equipped to get the most out of every single plant.
So get out there, start cultivating, and remember: the journey of growing cannabis is as rewarding as the plant itself. Happy flowering!

Mike Titan, the founder of Titan Seeds, is a seasoned cannabis cultivator and the mastermind behind the comprehensive grow guide available on the Titan Seeds website.