


 Seeds and Germination
 Grow Setup
 Seedling Stage
 Vegetative Growth
 Pre-flowering
 Flowering
 Ripening
 Harvesting
 Drying
 Curing
 Troubleshooting
 Training Techniques
Harvesting Cannabis the Right Way!
 15 Minute Read
PUBLISHED: July 29, 2024
You made it! It’s finally time to start harvesting cannabis!
Towards the end of the flowering stage of cannabis grow cycle comes time to harvest, but how do you know when the time is right?
Harvesting cannabis is the culmination of months of careful cultivation, a critical juncture that can significantly impact the quality, potency, and overall experience of your final product. Whether you’re a seasoned grower with acres of plants or a curious beginner tending to a few pots, understanding the intricacies of cannabis harvesting is essential for producing top-shelf buds.
In this comprehensive guide, we’ll delve deep into the art and science of harvesting cannabis. We’ll explore the subtle signs that indicate peak harvest time, the tools and techniques for a successful harvest, and the common pitfalls to avoid. From the initial cut to the final cure, we’ll cover every step of the process, providing you with the knowledge to maximize your yield and produce cannabis that stands out in both potency and flavor.
So, grab your magnifying glass and pruning shears – it’s time to unlock the secrets of a perfect cannabis harvest.
Timing Your Cannabis Harvest
The age-old question of when to harvest cannabis has puzzled growers for generations. Harvest too early, and you risk underdeveloped cannabinoids and a less potent product. Harvest too late, and you might end up with an overly sedative effect and degraded THC. The key lies in understanding the subtle signs your plants provide and having the patience to wait for the perfect moment.
Key Indicators of Harvest Readiness:
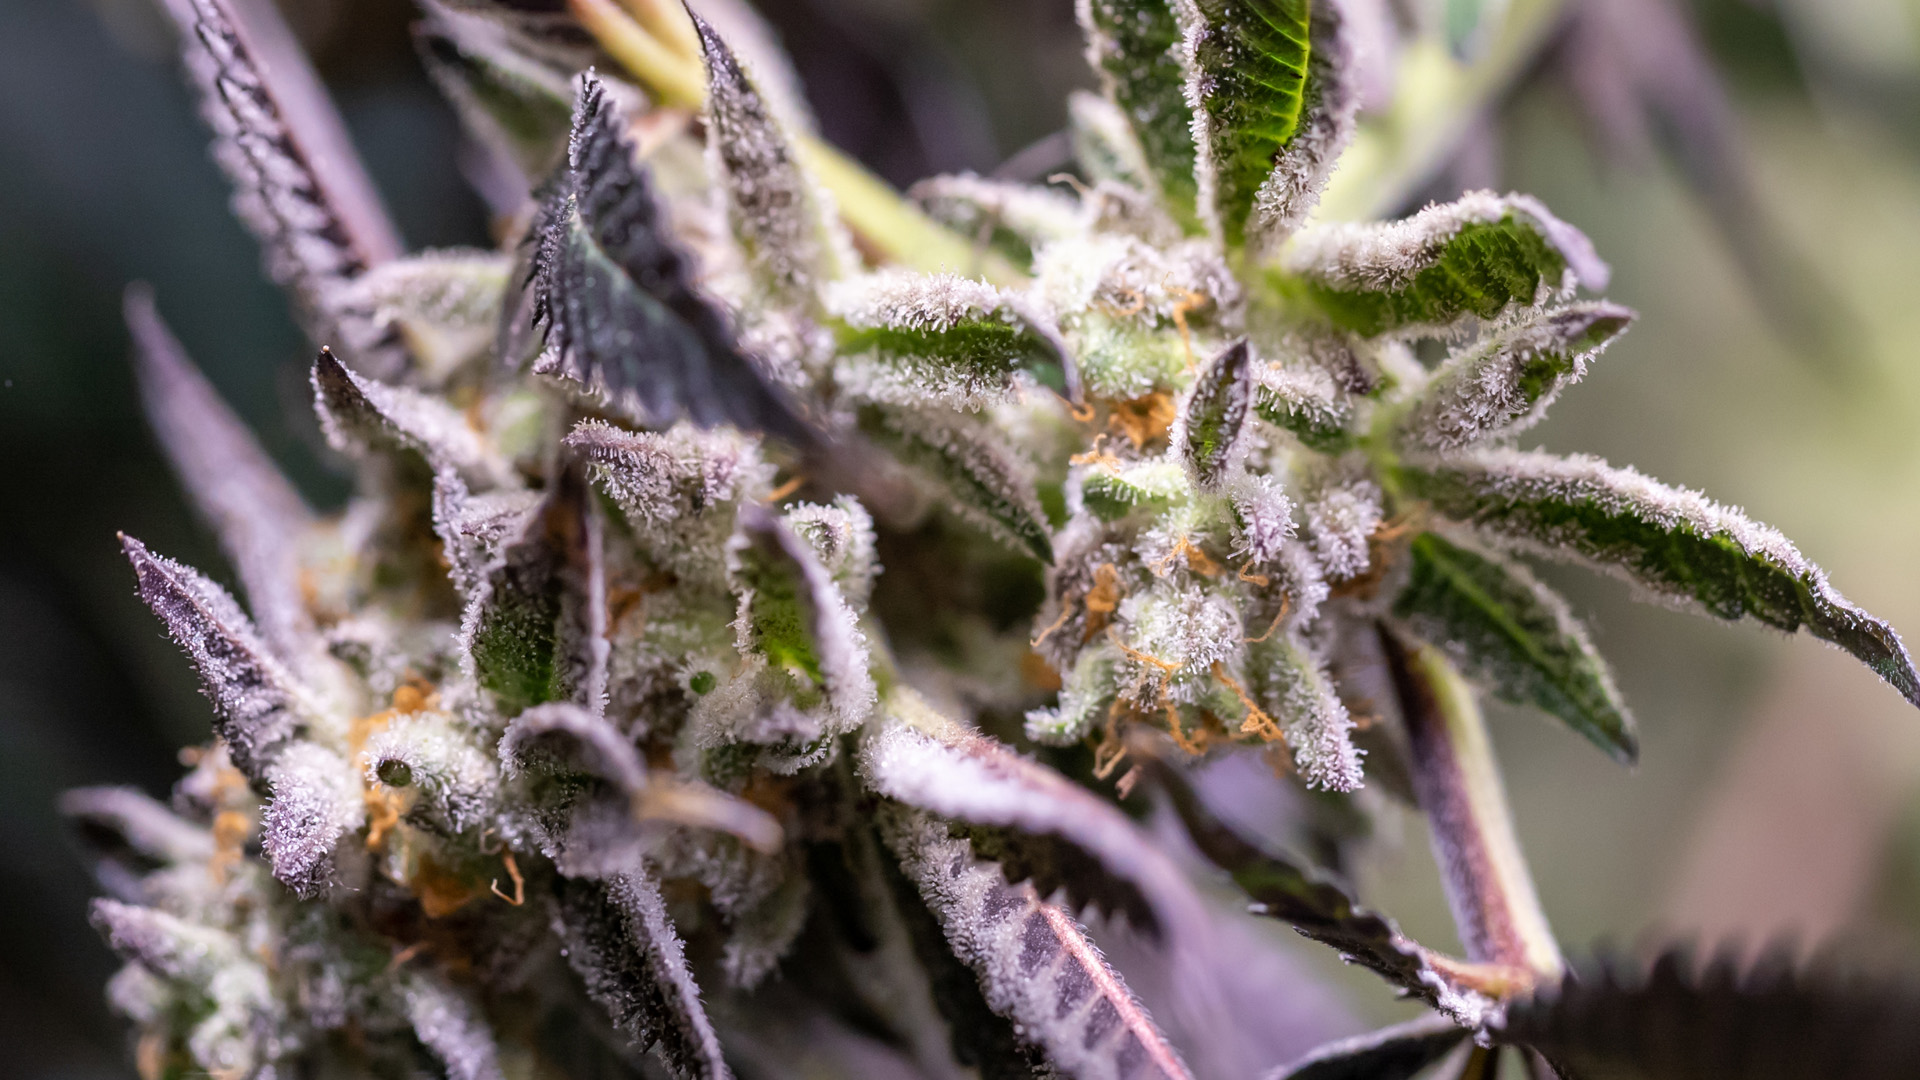
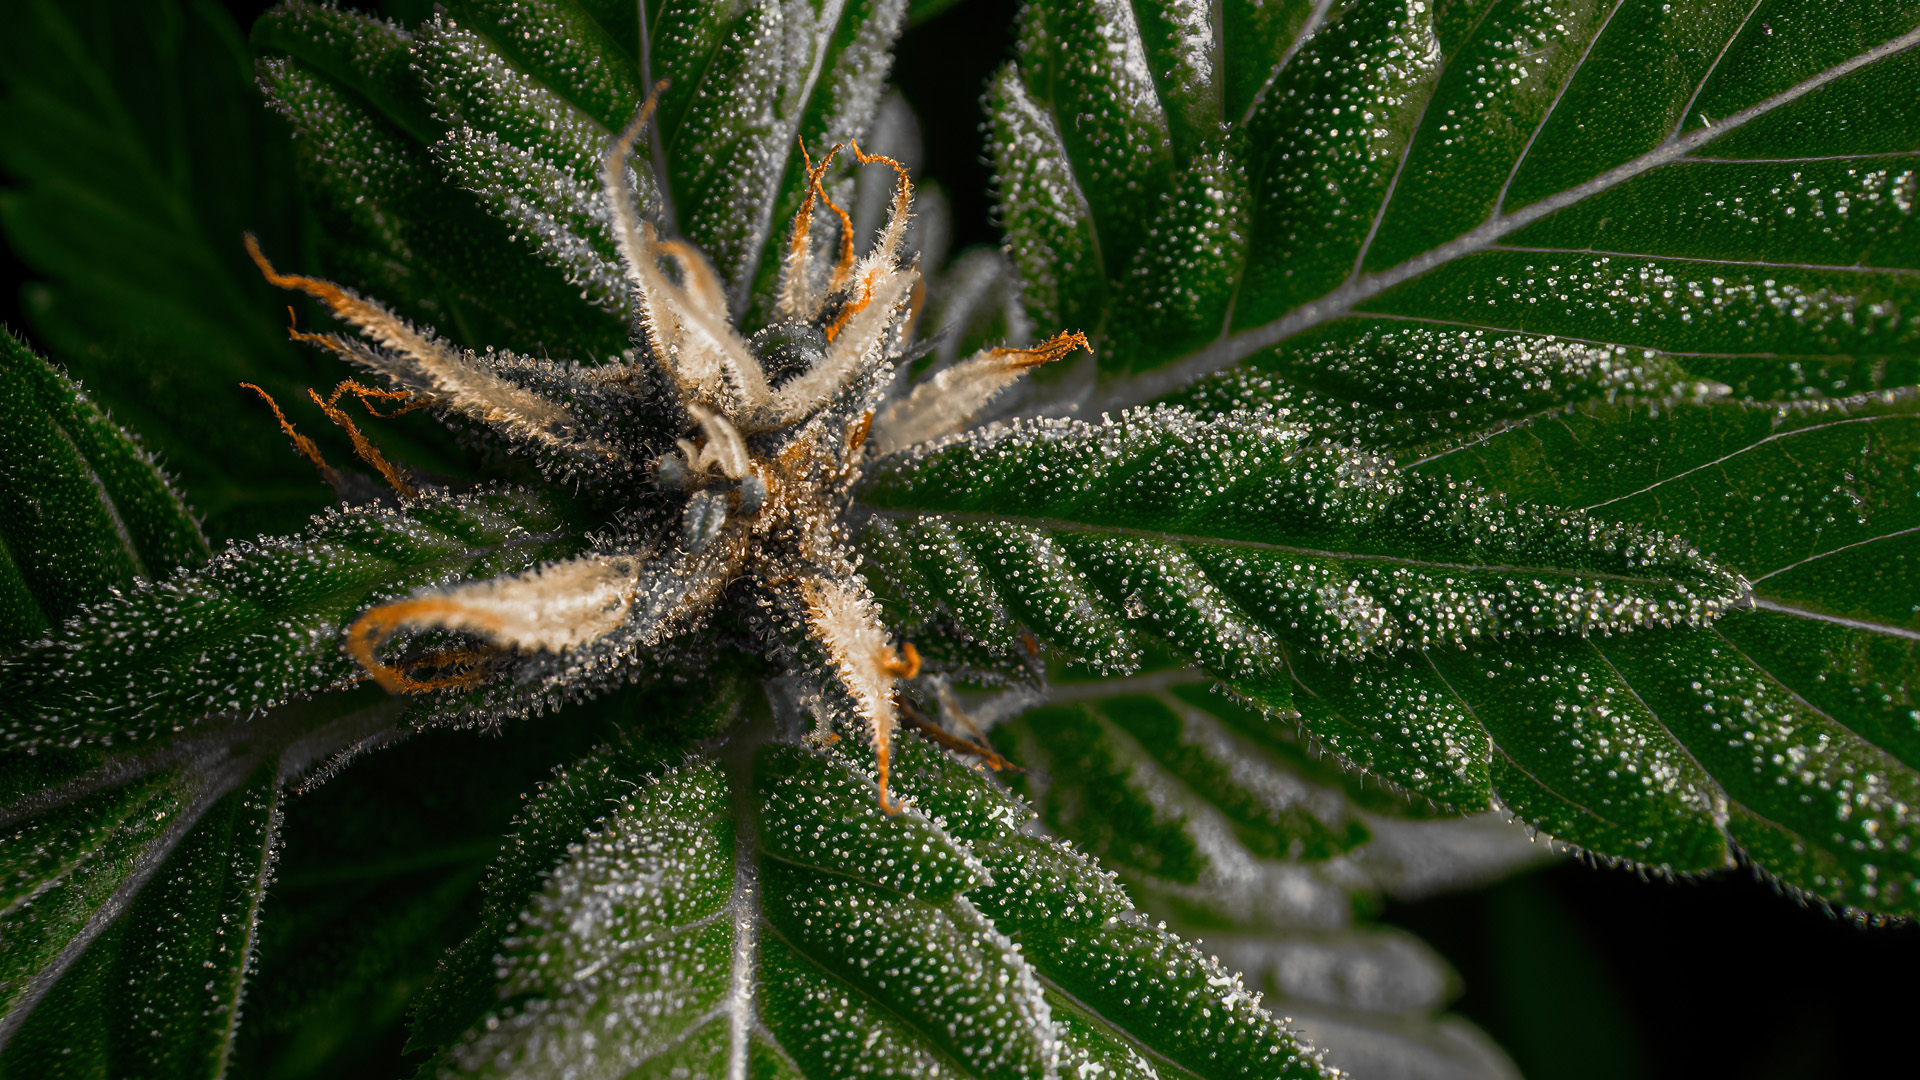
Trichome Color
Trichomes are the tiny, mushroom-shaped glands on cannabis flowers that contain the bulk of the plant’s cannabinoids and terpenes. They’re your most reliable indicator of harvest readiness.
- Use a jeweler’s loupe or a digital microscope to observe trichomes closely.
- Clear trichomes indicate the plant is not ready for harvest.
- Cloudy or milky white trichomes suggest peak THC content.
- Amber trichomes indicate CBD production and a more relaxing effect.
For most growers, the ideal harvest time is when 70-80% of trichomes are milky white, and 20-30% have turned amber. This balance provides a mix of euphoric and relaxing effects.
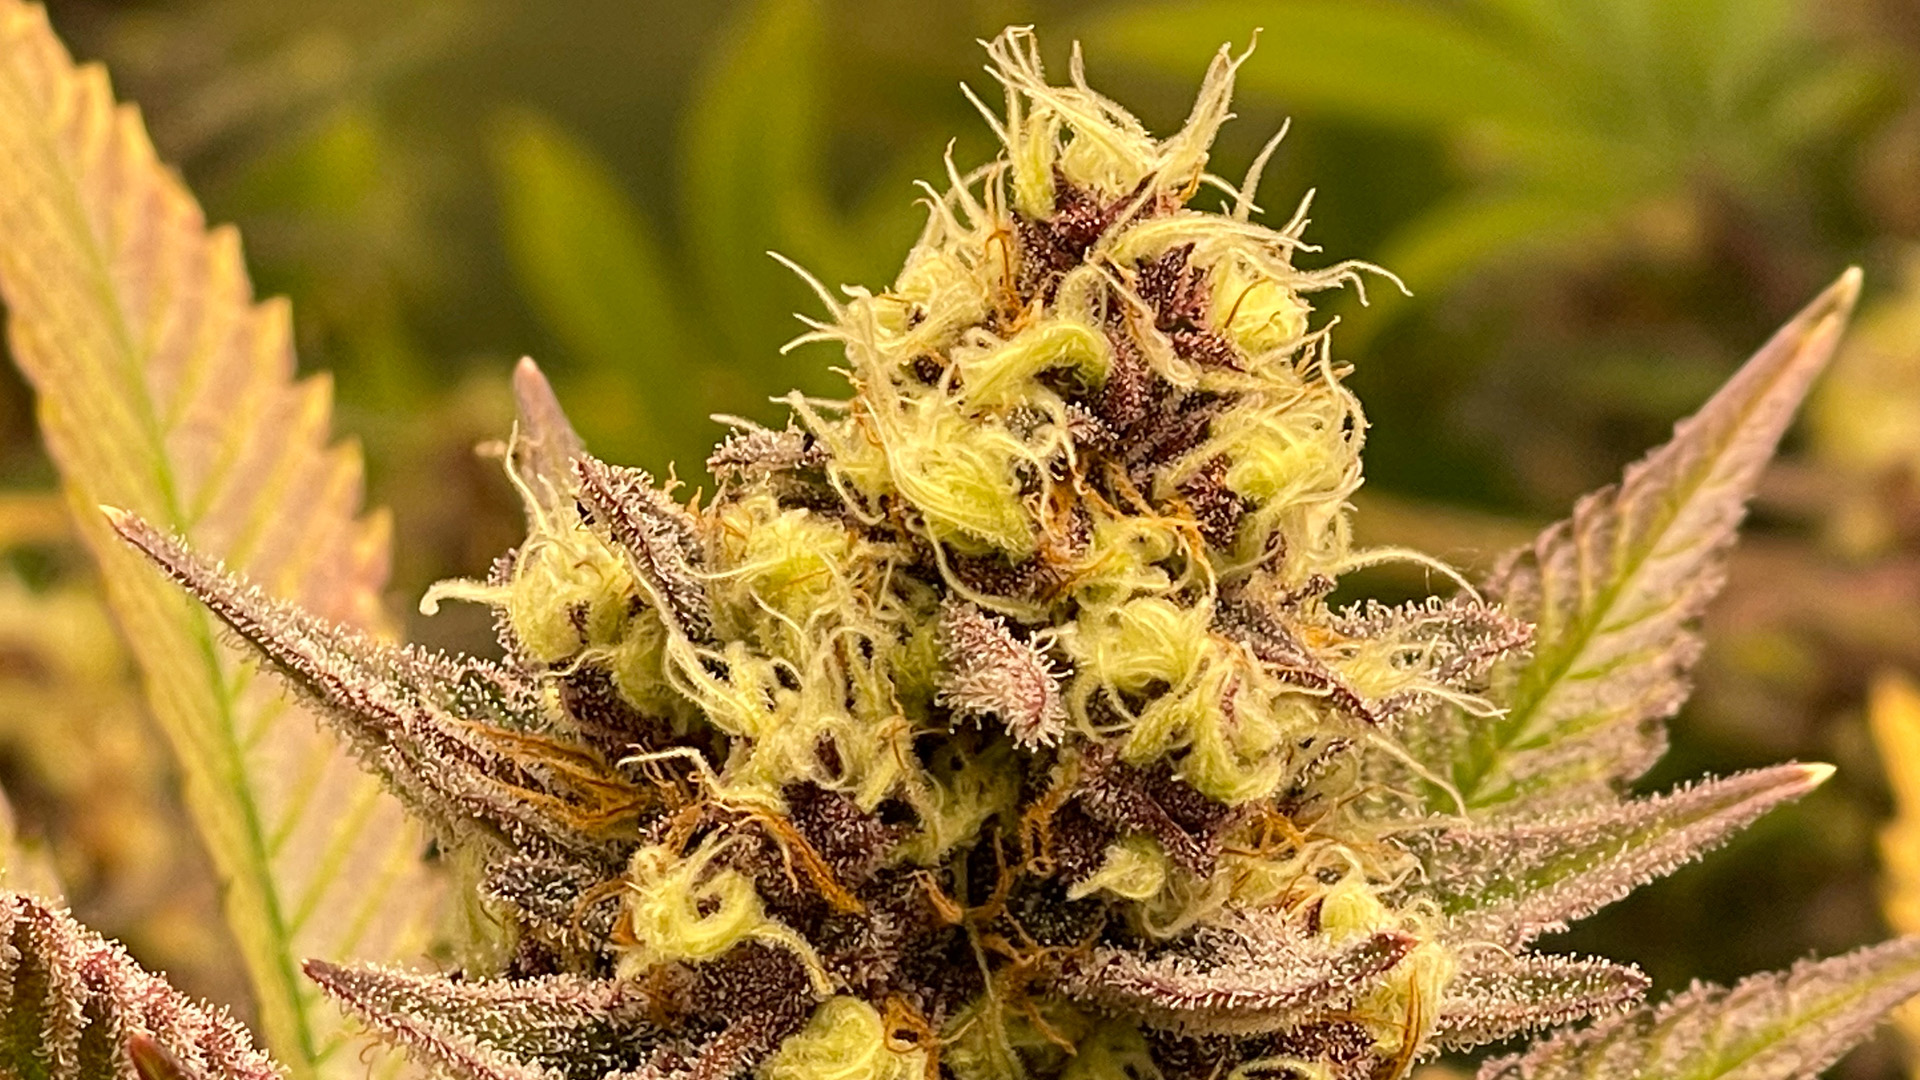
Pistil Color
Pistils, the hair-like structures on cannabis buds, offer another visual cue for harvest readiness.
- Young plants have white pistils that stand up straight.
- As the plant matures, pistils begin to darken and curl inward.
- When 70-80% of pistils have turned orange or brown, it’s generally a good time to harvest.
Remember, pistil color can vary by strain, so use this method in conjunction with trichome observation for best results. It’s natural that your Oreoz strain plant will look a fair bit different to a plant of the Motorbreath strain or even a similar strain like White Truffle.
Trichomes offer you the biggest insight into when you should harvest cannabis.
Leaf Color
As cannabis plants reach maturity, you may notice changes in leaf color.
- Larger fan leaves may start to yellow and die off.
- This is a natural part of the plant’s life cycle as it directs energy to bud production.
- However, rapid yellowing could indicate nutrient deficiencies, so monitor closely.
Bud Density
Mature buds should feel firm and dense when gently squeezed.
- Underdeveloped buds will feel soft and airy.
- Overly dense buds might indicate it’s past peak harvest time.
Seed Presence
In seeded plants (not common in most cultivation setups):
- Seeds will be dark and hard when the plant is ready for harvest.
- If seeds are still soft and white, the plant needs more time.
Seasonal Considerations
For outdoor growers, nature provides additional harvest indicators:
- Many cannabis strains are ready for harvest in early to mid-fall.
- Cooler temperatures and shorter days signal the plant to finish flowering.
- Be prepared to harvest before the first frost in your area.
Strain-Specific Timing
Different cannabis strains have varying cannabis flowering times:
- Indica strains typically have a shorter flowering period (6-8 weeks).
- Sativa strains often require longer flowering times (10-12 weeks or more).
- Autoflowering strains have predetermined life cycles, usually ready in 10-12 weeks from seed.
Always research your specific strain’s expected flowering time and characteristics.
The Art of Patience
Remember, timing your cannabis harvest is as much an art as it is a science. While these indicators provide valuable guidance, developing an intuitive understanding of your plants comes with experience. Don’t be afraid to keep detailed notes and experiment with harvesting different plants at slightly different times to find your perfect balance.
Tools for Harvesting Cannabis:
Having the right tools at your disposal can make the difference between a smooth, efficient harvest and a frustrating, potentially damaging experience.
Here’s a comprehensive list of tools you’ll need, along with their purposes and some pro tips:
Pruning Shears
- Purpose: For cutting branches and stems.
- Features to look for: Sharp, stainless steel blades; comfortable grip; spring-loaded mechanism.
- Pro tip: Keep multiple pairs on hand and sterilize them regularly with rubbing alcohol to prevent the spread of pathogens.
Trimming Scissors
- Purpose: For detailed trimming of buds and removal of sugar leaves.
- Features to look for: Sharp, pointed tips; ergonomic design for prolonged use.
- Pro tip: Consider specialized trimming scissors with curved blades for easier maneuvering around buds.
Gloves
- Purpose: To protect trichomes and keep hands clean.
- Types: Latex, nitrile, or rubber.
- Pro tip: Some growers prefer textured gloves for better grip, while others opt for smooth gloves to collect finger hash.
Drying Rack or Clothesline
- Purpose: For hanging and drying harvested plants.
- Options: Mesh drying racks, clotheslines with clips, or specialized drying systems.
- Pro tip: Ensure your drying area has good air circulation to prevent mold growth.
Hygrometer
- Purpose: To monitor humidity levels during drying and curing.
- Features to look for: Digital display; accuracy within 1-2% RH.
- Pro tip: Place hygrometers in several locations in your drying area to ensure consistent conditions.
Magnifying Tool
- Purpose: For examining trichomes to determine harvest readiness.
- Options: Jeweler’s loupe, digital microscope, or magnifying glass.
- Pro tip: A 60-100x magnification is ideal for trichome observation.
Trim Bin
- Purpose: To collect fallen trichomes during trimming.
- Features: Fine mesh screen, comfortable height for sitting or standing.
- Pro tip: The collected kief can be used for making concentrates or enhancing the potency of your flower.
Clean, Sharp Blade
- Purpose: For removing entire plants at the base.
- Options: Pruning saw, sharp knife, or heavy-duty scissors.
- Pro tip: Ensure the blade is clean and sharp to make clean cuts and reduce plant stress.
Rubbing Alcohol
- Purpose: For cleaning and sterilizing tools.
- Pro tip: Keep a small container of alcohol nearby to dip tools in between cuts, especially when working with multiple plants.
Storage Containers
- Purpose: For storing trimmed buds during the drying process.
- Options: Paper bags, cardboard boxes, or specialized drying containers.
- Pro tip: Avoid plastic bags, which can trap moisture and promote mold growth.
Labels and Markers
- Purpose: For keeping track of different strains and harvest dates.
- Pro tip: Use waterproof labels and markers to prevent smudging from moisture.
Comfortable Seating
- Purpose: For maintaining comfort during long trimming sessions.
- Pro tip: Consider a chair with good back support and adjustable height.
Good Lighting
- Purpose: For detailed visual inspection of buds.
- Options: LED work lights, headlamps, or adjustable desk lamps.
- Pro tip: Choose a light with a color temperature close to daylight (5000-6500K) for accurate color representation.
Scale
- Purpose: For weighing your harvest.
- Features to look for: Accuracy to at least 0.1 grams; capacity suitable for your harvest size.
- Pro tip: Calibrate your scale regularly for accurate measurements.
Having these tools ready before you begin harvesting will streamline the process and help ensure the best possible outcome for your cannabis crop. Remember, quality tools are an investment in the quality of your final product.
Step-by-Step Guide to Harvesting Cannabis
Now that you’ve determined the right time to harvest and gathered your tools, let’s walk through the harvesting process step by step.
Flush Your Plants
Flushing is a crucial step that occurs 1-2 weeks before harvest. This process involves stopping all nutrient feedings and using only pH-balanced water. Flushing helps remove excess nutrients from the plant, resulting in a smoother, cleaner-tasting final product.
- For soil-grown plants, flush for 1-2 weeks
- For hydroponic setups, 3-7 days is usually sufficient
- Look for slight yellowing of fan leaves as a sign of successful flushing
Prepare Your Workspace
Before you begin harvesting, set up a clean, well-lit area for harvesting and trimming. Ensure all your tools are clean and easily accessible. Having everything prepared in advance will make the process smoother and more efficient.
Cut Down the Plant
When the time comes to harvest, start by cutting the main stem near the base of the plant. For larger plants, you may need to cut it down in sections. Use clean, sharp pruning shears or a pruning saw for thicker stems. Handle the plant gently to avoid damaging trichomes.
Remove Large Fan Leaves
After cutting down the plant, remove the large fan leaves. These leaves contain little to no THC and can hinder the drying process if left on. Removing them improves air circulation during drying, reducing the risk of mold.
Decide on Wet or Dry Trimming
At this point, you’ll need to decide between wet trimming (immediately after harvest) or dry trimming (after drying). Each method has its pros and cons:
Wet Trimming:
- Easier to remove leaves as they haven’t curled in yet
- Results in a cleaner-looking final product
- Quicker drying time
Dry Trimming:
- Allows for a slower drying process, potentially preserving more terpenes
- Can be easier for maintaining humidity levels during drying
- Some argue it results in a better-tasting final product
Hanging to Dry
Whether you choose to wet or dry trim, the next step is hanging your harvest to dry. Suspend branches upside down on a drying rack or clothesline. Ensure good air circulation around all buds to prevent mold.
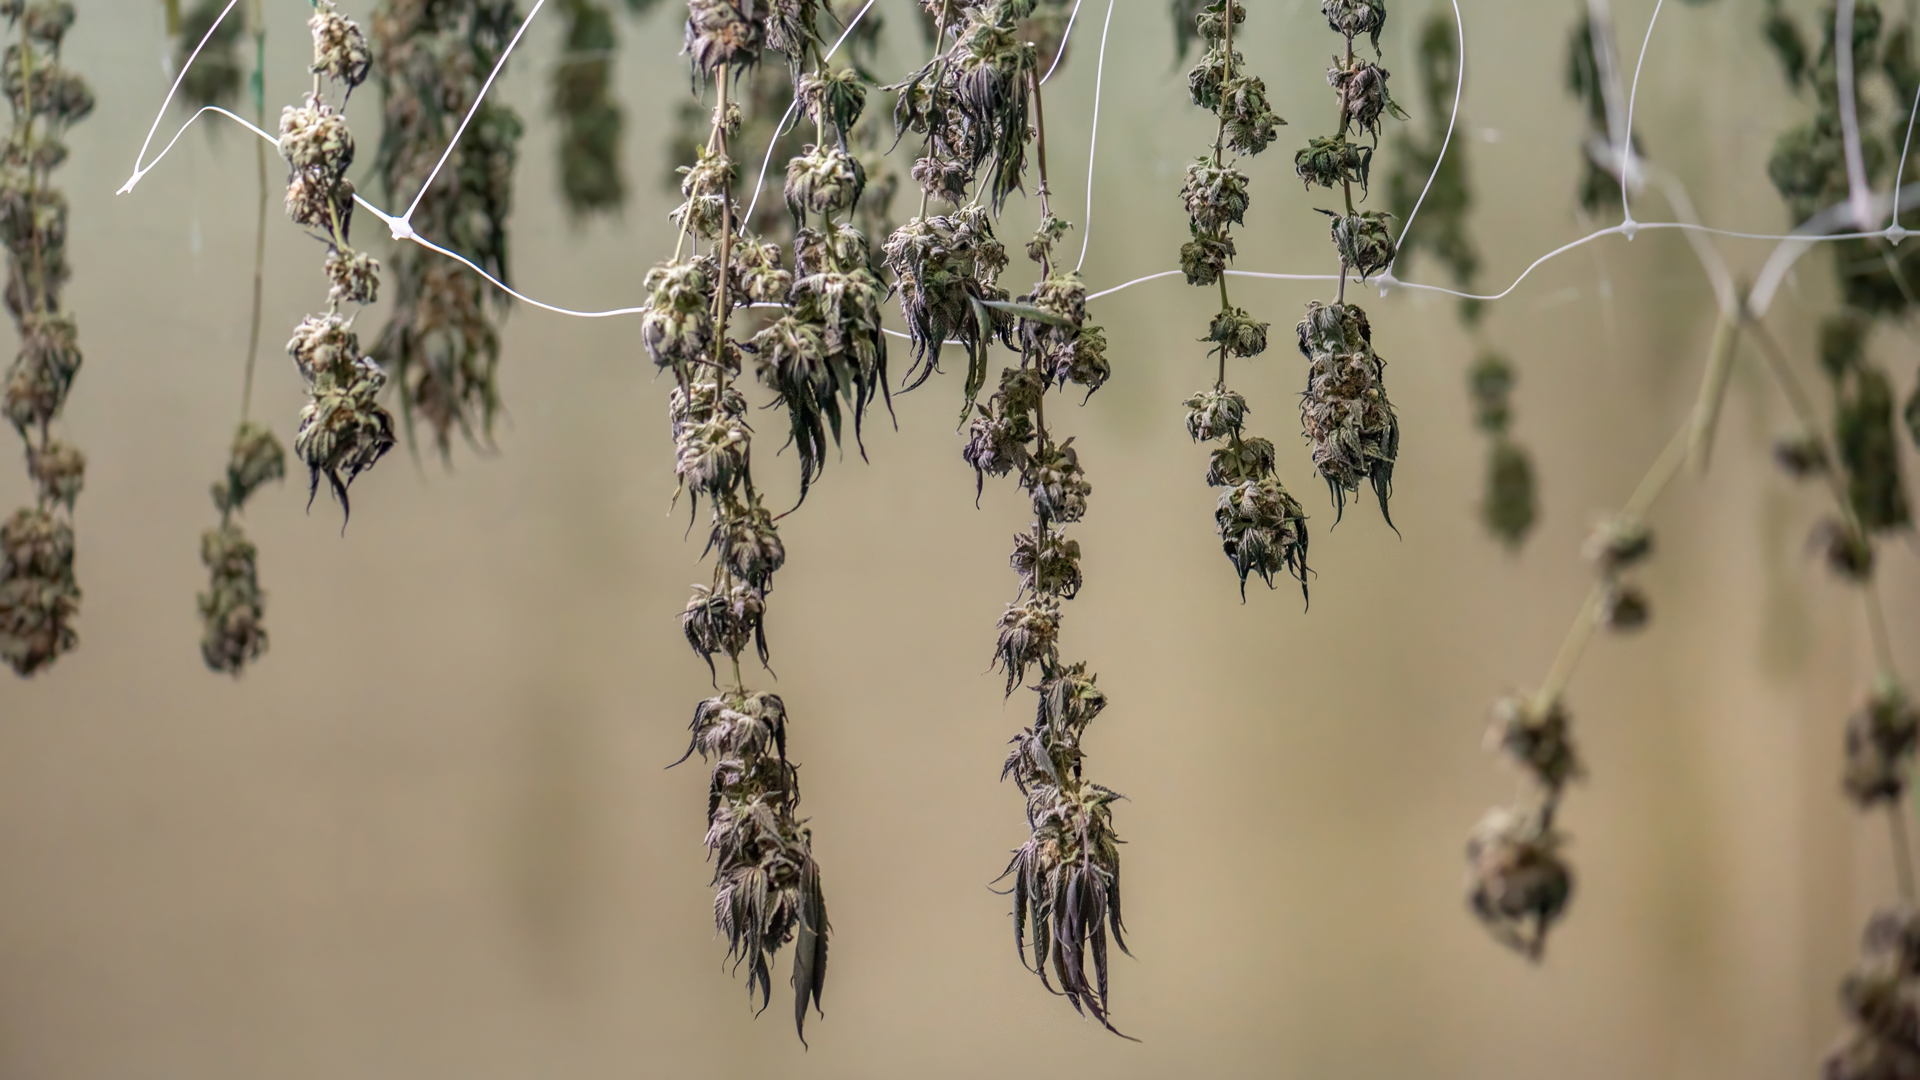
The drying environment is crucial:
- Temperature: Maintain between 60-70°F (15-21°C)
- Humidity: Keep at 45-55% • Light: Minimal to none, as light can degrade THC
- Air Flow: Gentle, constant air movement without direct fans on the buds
Drying typically takes 7-14 days, depending on your environment and the density of your buds. Buds are ready when small branches snap rather than bend when you try to break them.
Curing Your Buds
Curing is often overlooked but is essential for bringing out the best in your cannabis. Once dry, place buds in airtight glass jars, filling them about 75% full. Store these jars in a cool, dark place.
For the first week, open the jars daily for about 15 minutes to release moisture and replenish oxygen. This process is known as “burping” and is crucial for preventing mold and allowing for the proper breakdown of chlorophyll.
After the first week, you can reduce burping to once every few days. Continue curing for at least 2-4 weeks, though some growers cure for several months for optimal flavor and smoothness.
Final Quality Check
Before considering your harvest complete, perform a final quality check:
- Inspect cured buds for any signs of mold
- Check aroma and texture to ensure proper curing
- Test a small amount to assess quality and potency
Common Cannabis Harvesting Mistakes to Avoid
Even experienced growers can make mistakes during the harvesting process. Being aware of these common pitfalls can help you avoid them and ensure a successful harvest.
Harvesting Too Early or Late
Timing is crucial in cannabis harvesting. Harvesting too early results in underdeveloped cannabinoids and a less potent product. On the other hand, harvesting too late can lead to a more sedative effect and degraded THC.
Signs of harvesting too early:
- Clear trichomes
- Mostly white pistils
- Underdeveloped buds
Signs of harvesting too late:
- Excessive amber trichomes
- Bud degradation
- Leaf yellowing and dying
To avoid this mistake, closely monitor trichome development and pistil color. Use a magnifying tool to observe trichomes, aiming for mostly cloudy with some amber. Keep detailed records of your grow to better predict harvest times in future cycles.
Rough Handling of Buds
Cannabis buds are delicate, and rough handling can damage trichomes, reducing potency and aroma. Always handle your plants and buds gently throughout the harvesting and trimming process.
Tips for gentle handling:
- Use clean, sharp tools for cutting and trimming
- Avoid squeezing or dropping buds
- Move branches and buds carefully when hanging to dry
Remember, the goal is to preserve as many trichomes as possible, as these contain the bulk of the plant’s cannabinoids and terpenes.
Improper Drying Conditions
Drying cannabis too quickly or too slowly can significantly impact the final product. Fast drying can lead to harsh smoke and a loss of terpenes, while slow drying increases the risk of mold.
To ensure proper drying:
- Maintain temperature between 60-70°F (15-21°C)
- Keep humidity at 45-55%
- Ensure good air circulation without direct fans on buds
- Use a hygrometer to monitor conditions and adjust as necessary
Consider using a climate control system for larger operations or challenging environments. The investment in proper drying conditions will pay off in the quality of your final product.
Skipping the Curing Process
Curing is essential for developing the full flavor profile and smoothness of your cannabis. Skipping this step often results in a harsh, less enjoyable product.
Benefits of proper curing:
- Enhances flavor and aroma
- Improves smoothness of smoke
- Increases potency as THC converts to its psychoactive form
Always allocate time for proper curing. While it requires patience, the improvement in quality is well worth the wait. Use this time to plan your next grow cycle or to educate yourself further on cannabis cultivation techniques.
Contamination During Harvest
Using dirty tools or handling buds with bare hands can introduce contaminants, potentially leading to mold or bacterial growth.
To prevent contamination:
- Clean and sterilize all tools before use
- Wear gloves while handling buds
- Ensure your drying and curing areas are clean and free from potential contaminants
By avoiding these common mistakes, you’ll be well on your way to consistently producing high-quality cannabis harvests. Remember, attention to detail and patience are key throughout the entire harvesting process.
Advanced Techniques for Experienced Growers
As you gain experience with cannabis cultivation and harvesting, you may want to explore some advanced techniques to further improve your yields and product quality.
Staggered Harvesting for Optimized Potency
Instead of harvesting an entire plant at once, some growers opt for a staggered approach. This involves harvesting the top colas first, then allowing lower buds to mature for another week or two.
Benefits of staggered harvesting:
- Maximizes overall potency, as different parts of the plant may mature at slightly different rates
- Allows for a more customized final product
- Can increase overall yield as lower buds receive more light and resources
This technique requires more time and effort but can result in a more premium product. Keep detailed notes on the differences in potency and effects between the staggered harvests to refine your approach over time.
Using Climate-Controlled Drying Rooms
For larger operations or those in challenging climates, investing in a climate-controlled drying room can ensure consistent, optimal drying conditions. These setups allow for precise control over temperature, humidity, and air flow.
Components of a climate-controlled drying room:
- Dehumidifiers and humidifiers
- Air conditioning and heating systems
- Ventilation and air circulation fans
- Automated control systems for maintaining ideal conditions 24/7
While the initial investment can be significant, the improvement in product consistency and quality can make it worthwhile for serious growers.
Experimenting with Different Curing Methods
While the jar method is most common, some growers experiment with alternative curing techniques:
Water Curing:
- Submerge buds in water for a week, changing water daily
- Dry normally after water curing
- Can result in a smoother smoke but may reduce flavor
Freeze Drying:
- Uses specialized equipment to rapidly remove moisture at low temperatures
- Preserves more terpenes but requires expensive equipment
Dry Ice Curing:
- Place dry ice in sealed containers with buds to rapidly remove moisture
- Can preserve terpenes but requires careful handling of dry ice
Each method has its pros and cons, and experimentation is key to finding what works best for your specific needs and preferences. Always start with small batches when trying new techniques to minimize potential losses.
By exploring these advanced techniques, you can continue to refine your skills and potentially produce even higher quality cannabis. Remember, the key to success with these methods is careful observation, detailed record-keeping, and a willingness to learn from both successes and failures.
Troubleshooting Common Harvesting Issues
Even with careful planning and execution, you may encounter some common issues with growing cannabis during the harvesting process. Here are some common problems and how to address them:
Mold or Bud Rot
Mold can quickly ruin your harvest if not caught early. It often appears as white, fuzzy growth on buds or stems.
Prevention:
- Maintain proper humidity levels during flowering and drying
- Ensure good air circulation around plants and drying buds
- Avoid overwatering, especially late in flowering
If you spot mold:
- Remove affected buds immediately to prevent spread
- Increase air circulation in your drying area
- Consider lowering humidity if it’s consistently high
Nutrient Burn During Flushing
Sometimes, plants may show signs of nutrient burn (leaf tip yellowing or browning) during the flushing period.
To address this:
- Ensure you’re using pH-balanced water for flushing
- Consider extending the flush period if symptoms persist
- Remember that some color change is normal during flushing
Uneven Drying
If some buds are drying faster than others, it can lead to inconsistent quality.
Solutions:
- Separate larger and smaller buds for drying
- Rotate drying racks or reposition hanging branches regularly
- Use humidity packs in jars during curing to even out moisture content
Harsh Smoke After Curing
If your cured cannabis is still harsh when smoked, it may indicate incomplete curing.
To improve:
- Extend the curing period for several more weeks
- Ensure proper humidity levels in curing jars (58-62% RH)
- Consider water curing for extremely harsh buds
Maximizing Yield and Potency
While proper harvesting techniques are crucial, the foundation for a great harvest is laid throughout the growing process. Here are some tips to maximize your yield and potency:
During the Growing Phase:
- Implement cannabis training techniques like LST (Low Stress Training) or SCROG (Screen of Green) to increase bud sites
- Optimize your lighting setup to ensure even coverage
- Maintain proper nutrient levels and pH throughout the grow
Just Before Harvest:
- Consider a 48-hour dark period before harvesting to potentially increase resin production
- Gradually lower temperatures in the final week to bring out purple hues in some strains
During Drying and Curing:
- Aim for a slow, controlled dry to preserve terpenes
- Cure for at least 2-4 weeks, with some growers preferring 6-8 weeks for premium quality
Post-Harvest Analysis and Record Keeping
After each harvest, take time to analyze your results and keep detailed records. This practice is invaluable for improving your techniques over time.
What to Record:
- Strain information and genetics
- Grow medium and nutrients used
- Environmental conditions throughout the grow
- Harvest date and plant characteristics at harvest
- Drying and curing methods used
- Final yield and quality assessment
Use this information to refine your approach for future grows. Consider keeping a grow journal or using cultivation management software for more detailed tracking.
Final Words on Cannabis Harvest
Harvesting cannabis is both an art and a science. It requires attention to detail, patience, and a willingness to learn and adapt. By understanding the key indicators of readiness, using the right tools and techniques, and avoiding common pitfalls, you can significantly improve the quality and potency of your harvest.
Remember, every strain and every grow is unique. What works perfectly for one crop might need adjustment for another. The key is to remain observant, keep detailed records, and be willing to experiment and learn from each harvest.
Whether you’re growing for personal use or as part of a larger operation, the principles remain the same: respect the plant, pay attention to detail, and always strive for quality. With the knowledge gained from this guide and your own growing experience, you’re well-equipped to produce top-shelf cannabis that you can be proud of.
Happy harvesting, and may your buds be bountiful and potent!

Mike Titan, the founder of Titan Seeds, is a seasoned cannabis cultivator and the mastermind behind the comprehensive grow guide available on the Titan Seeds website.